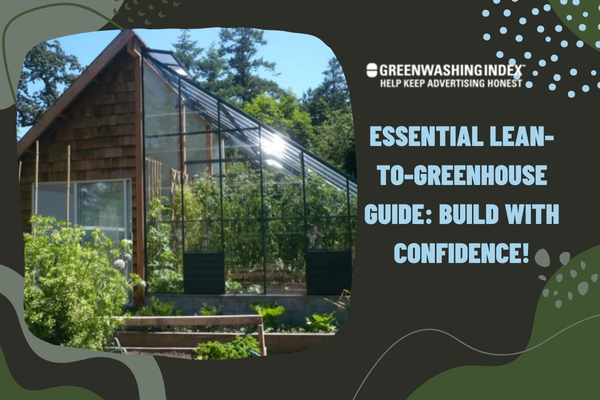
Are you dreaming of a gardening oasis right in your own backyard? Well, say hello to the lean-to greenhouse – your year-round ticket to green-thumb bliss! Imagine stepping into a space where your plants thrive, no matter what the weather outside is doing. Intrigued? There’s nothing quite like savoring fresh veggies and blooms all year long, and I’m here to tell you that building a greenhouse against your very home isn’t just doable; it’s downright exciting!
When constructing a lean-to greenhouse it starts with selecting a spot against an existing wall that enjoys plenty of sunlight. Your plants will love soaking up those rays! Ensuring the area has easy access and strong structural support is key.
Using materials that are both cost-effective and sturdy means more savings down the road with less maintenance fuss. And by preparing a solid foundation followed by accurate construction techniques, you’ll have a resilient gardening haven ready for any season.
What You’ll Discover Here:
- Tips on picking the sunniest spot for happy plants
- Steps to draft a simple yet robust design plan
- Advice on affordable materials tough enough for Mother Nature
- The nitty-gritty of grounding your structure firmly in place
- Building secrets to avoid common mistakes
Choosing the Perfect Location for Your Lean-to-Greenhouse
When I think about building my own lean-to greenhouse, one of the first things I need to consider is where I’m going to place it. The location is super important because it can affect how well my plants will grow.
Assessing Your Space
To pick the best spot for my lean-to greenhouse, I look at these points:
- Sunlight Exposure: My plants love the sun. They need it to grow strong and healthy. So, I chose a wall that gets a lot of sunlight during the day. Ideally, a south-facing wall is perfect if you live in the northern hemisphere because it gets sunlight for most of the day.
- Convenience of Access: I want to make sure my greenhouse isn’t just floating in some far corner of my yard. It should be close enough so that getting water hoses, tools, and myself over there isn’t a hassle.
- Structural Support: The wall that supports my lean-to greenhouse needs to be solid — like brick or concrete — so it can hold up the structure without any problems.
Here’s what I do step by step:
- First thing in the morning, I look at how sunlight spreads across my yard.
- Next, I keep an eye on this throughout different times during the day to know which area gets consistent sunshine.
- Then, walking around with a tape measure helps me figure out if there’s enough space against that perfect sunny wall.
- Lastly, make sure no trees or other buildings will throw shade on this spot as seasons change.
Considering Climate Conditions
The way the weather acts in your area plays into where your lean-to greenhouse should go, too!
- Direction Facing: A lot has been said about south-facing being best, and yes, because this direction often offers more light and warmth than other directions.
- Weather Patterns: Think about wind – does your place get crazy gusts from one direction? You don’t want your pretty little garden structure knocked around or harmed.
So here’s what I like doing:
- Stand outside and watch how the wind seems to blow through my potential greenhouse space.
- Have talks with other gardeners nearby or check online forums specific to my region — folks are usually happy to share tips on what works locally!
- Marking down when it rains heavily is good, too, since too much rain pooling up might mean bad news for structural support over time.
Taking time to choose just right can seem pesky now, but trust me — future me always thanks past me for thinking ahead when those tomatoes are thriving!
Also Read: Master Smell-Free Apartment Composting: An Ultimate Guide
Planning Your Lean-to-Greenhouse Construction
Building a lean-to greenhouse can be an exciting project. It’s all about creating the perfect little spot for your plants to thrive. So, to make sure everything goes smoothly, good planning is key.
Drafting a Design
When I set out to build my own lean-to greenhouse, I knew I had to start with a solid plan. So here’s what I did, and you should too:
- Measure Your Space: First off, figure out how much space you have against your house or wall where the lean-to greenhouse will be attached. Remember to leave some space for walking around it.
- Think About Sunlight: Make sure your design plans for the most sun exposure. After all, plants love sunlight!
- Sketch it Out: Grab paper and pencil and sketch your lean-to greenhouse.
- Outline: Draw the basic shape looking from the side and the front.
- Door Location: Mark where you want the door – this is important for easy access.
- Ventilation Windows: Decide on places where windows or vents might go – plants need to breathe, too!
- Plan for Water and Electricity: If you need water or power in your greenhouse, think about how those lines will run.
- Check Local Rules: Sometimes there are rules about building things at home – better check so there’s no trouble later.
Taking time to draft a good design for your lean-to greenhouse is like making a map before a trip; it helps you not get lost on the way.
Selecting Materials
Next up was choosing stuff I needed to turn my lean-to greenhouse dreams into reality.
- For the frame:
- Wood: It’s pretty and traditional but needs treatment so it doesn’t rot.
- Aluminum: It doesn’t rust, which is cool, but it can be pricier.
- PVC Pipes: These are cheaper and easier to handle but might not last as long under strong sun or snow.
- For covering (otherwise known as glazing):
- Glass: Classic look! But heavy and can break easily if something hits it hard.
- Polycarbonate Panels: They’re like plastic glass – lighter stronger than real glass but can turn yellowish over time.
- Don’t forget about:
- Nails or screws (to hold everything together)
- Hinges (for doors and windows)
Choosing materials means thinking about cost versus how long they’ll last – after all, nobody wants their cozy little plant home falling apart next season! You might spend more now on something sturdy rather than replacing cheaper stuff later on.
Remember these steps when planning out your very own lean-to greenhouse; they just might save you time, money, and stress down the road!
Also Read: Composting Cheese: Can It Be Done? Complete Guide
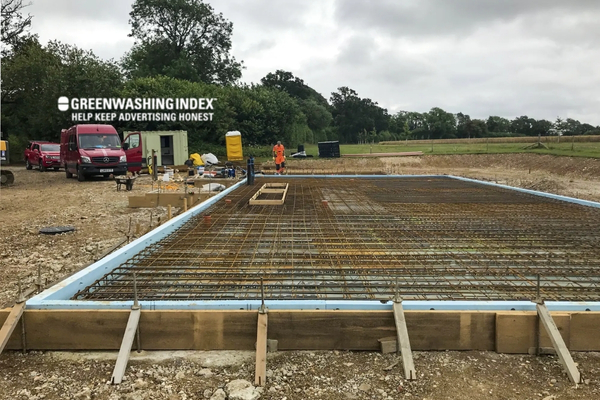
Foundations First: Groundwork for Stability
As I set out to guide you through building your own lean-to greenhouse, it’s essential we start from the bottom. The foundation isn’t the most exciting part of construction, but it’s crucial for stability. Let’s dig right in!
Preparing the Ground
When I prep my site for a greenhouse, I make sure to level the ground first. Here’s how you can ensure a solid base:
- Choose Your Site Wisely: Find a spot near a sturdy existing wall that faces the best direction for sun exposure.
- Clear the Area: Remove any grass, stones, or debris to get down to bare earth.
- Level It Out: Use a shovel and rake to make sure the surface is as flat as possible. A spirit level can contribute greatly!
- Tamp It Down: You’ll need to compact the soil so that it doesn’t settle unevenly later on.
Now let’s look at foundations more carefully:
- Direct Ground Contact: If your lean-to greenhouse is lightweight and small, simply evening-out soil might work.
- Concrete Foundation: For bigger structures, pouring a concrete slab ensures durability and often longevity.
- Dig Trenches: Make them about 6 inches deep where your walls will stand.
- Pour Concrete: Mix according to instructions and pour into trenches until level with the ground surface.
- Gravel Base:
- Start by laying down landscape fabric to prevent weeds.
- Pour gravel over this layer until it’s about 4 inches thick; this assists with drainage.
- Wooden Frame:
- Build or lay prefab wooden forms where the walls of the greenhouse will go.
- Ensure they are bolted together securely and level on all sides before proceeding further.
Anchoring Structures
Your lean-to greenhouse needs to be safely attached:
- Check Wall Integrity: First, inspect the wall for stability – you don’t want any surprises after mounting your structure.
- Use Appropriate Fixings:
- For brick walls, use heavy-duty anchors or expansion bolts that spread within masonry upon tightening
- For wooden walls, longer screws designed specifically for wood should do fine.
- Install Upright Supports: Now, place these along your wall at regular intervals; they’ll give extra hold for beams or framing of your lean-to.
- Secure Beams/Frame To Supports: Either bolt directly if metal framing is used or employ strong brackets if dealing with wood
- Solidify With Cross Bracing: A crisscross pattern created with additional lumber between supports stabilizes against the side.
Taking these steps assures me that my greenhouse stands strong against rough weather, which can come out of nowhere.
By focusing on creating an even ground foundation and ensuring our structures are anchored securely, we set ourselves up for success in our gardening adventures — growing plants happily in our very own backyard greenhouses!
Also Read: Composting Onions: Unearthing the Truth and Squashing Myths
Building Tips for a Sturdy Frame
When it’s time to build a lean-to greenhouse, getting your frame right is like laying the foundation for a strong house. A good, sturdy frame keeps everything else in place. Here’s what you need to focus on:
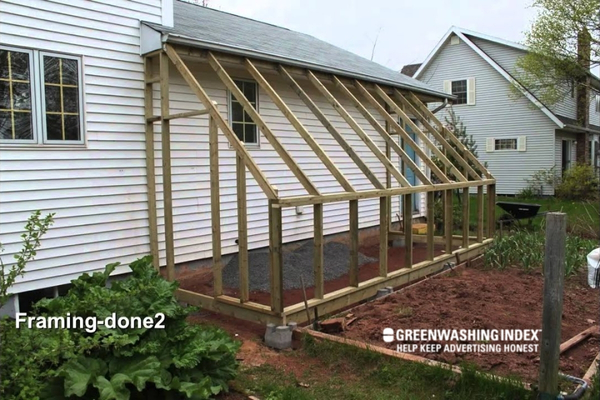
Constructing with Accuracy
When you’re building a lean-to greenhouse, making sure the frame is strong and straight is key. Here’s how to do that right:
- Choose Good Tools: To make sure everything is measured right and lines up, use tools like a tape measure, level, and square. These help you check that things are even and at the proper angles.
- Cut with Care: When cutting wood or metal for your frame, always measure twice before you cut. This way, you avoid mistakes and make sure every piece fits where it should.
- Drill Straight Holes: When putting in screws or bolts, it helps to drill pilot holes first. A pilot hole makes sure your screws go in straight without splitting the wood.
- Check Then Check Again: After attaching parts together, take time to double-check that each joint is tight and the frames are straight. Use your level to confirm everything is standing correctly.
- Reinforce Corners: For extra strength in your greenhouse corners, use corner brackets or diagonal braces. This keeps the whole structure more stable.
Incorporating Ventilation Systems
Having good airflow in your lean-to greenhouse is super important! It keeps plants healthy by letting air move around freely.
- Plan for Vents: Think about where vents will go while designing the greenhouse. You might put them on the roof or walls where air can come in and out easily.
- Adjustable Options: Making vents that can open or close gives you control over how much air gets into the greenhouse. You could build sliding panels or windows with hinges.
- Automatic Systems: For a real upgrade, think about automatic vent openers. These open when it gets warm inside and close when it cools down – without needing you to do anything!
Remembering these points helps make sure your lean-to greenhouse stays strong through all seasons and provides an ideal home for all your plants!
Also Read: Rice Composting: Ultimate Guide to Nutrient-Rich Soil
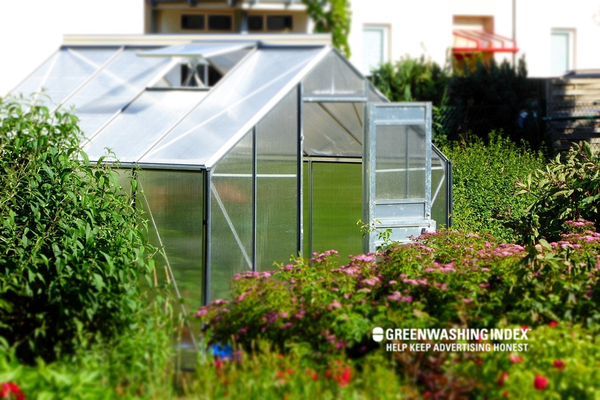
Installing Glazing- Maximizing Light While Protecting From Elements
When you’re planning to build a lean-to greenhouse, picking the right glazing is key for letting light in and keeping bad weather out. Here’s how to choose the best material for your greenhouse and some tips on putting it up without trouble.
Choosing Glazing Material
Picking the right stuff for your lean-to greenhouse is a big deal. You want your plants to get enough light, but you also want to keep them cozy. Let’s talk about glass, plastic, and polycarbonate – they’re all popular choices.
- Glass:
- Pros:
- The glass looks amazing! It lets in lots of light and doesn’t scratch easily.
- It can last a really long time if you take care of it.
- Cons:
- It can break if you don’t handle it gently. That could be unsafe.
- Glass can cost quite a bit more than other materials.
- Plastic (like Polyethylene):
- Pros:
- Plastic is tough stuff. It holds up well against the weather and won’t shatter.
- It can be cheaper than glass which is great if you’re watching your pennies.
- Cons:
- Over time, the sun may make plastic go cloudy or yellow. That means less light comes through.
- Scratches might happen easier compared to glass.
- Polycarbonates:
- Pros:
- Polycarbonates are strong like plastic but keep heat inside better.
- They have a double-wall design that’s good at spreading sunlight around inside the greenhouse.
- Cons:
- They still can turn yellow with time, but not as bad as regular plastic.
- You could pay more for these than simple plastic sheets.
Each material has good points and not-so-good ones. Think about what’s most important for your lean-to greenhouse when choosing one.
Technique Tips
Now let’s talk about how to put that glazing on without getting into trouble:
- Get Your Frame Ready: Be sure your frames are solid before you start hanging any glazing up there. Wobbly frames mean trouble down the road.
- Measure Twice: Always measure twice, then cut once – this old saying saves time and money when cutting materials to fit your frame just right.
- Seal it Tight: Use proper seals around the edges so water doesn’t sneak in; wet greenhouses can grow mold or harm plants.
- Drill Guided Holes: Put drill holes into polycarbonate or plastic sheets before screwing them on; this stops them from cracking under pressure.
- Safety Gear is Key: Wear gloves and goggles because bits of hard material can fly around when drilling or cutting.
- Gentle Handling: If using glass, move slowly with plenty of help; remember, broken glass isn’t just wasteful — it’s dangerous, too!
- Avoid Too Much Force: Don’t tighten screws too much; overdoing it could crack those pricey panels.
Remember these pointers when installing glazing in your backyard greenhouse so everything goes smoothly!
Finalizing Construction – Details That Make A Difference
Building a lean-to greenhouse has its own set of rewards. It’s like creating a special place where my plants can grow, safe from the harshness outside. But there’s something super important that I should not overlook — making sure it stands strong against all sorts of weather.
Sealing Against Weather
So let me talk about how I keep my plants safe and snug inside the greenhouse. Now, you’d think putting up the structure is enough, right? But nope, there’s more to it.
If you’ve ever felt a draft in your house during winter or watched rainwater trickle in through a window frame, then you know why sealing is crucial. Imagine those tiny cracks and gaps as secret doorways for cold air, moisture, and even little critters to sneak into your precious garden space!
What I do first is take a good look around my newly built lean-to greenhouse and spot any places that might let in unwanted guests — like gaps where the walls meet the roof or around doors and vent openings. After pinpointing these spots, it’s time to block them out.
I pick up some weather stripping or caulking. These are tools of the trade when it comes to sealing. Basically, weather-stripping is like this squishy tape that compresses to fill in spaces around moving parts — think doors and vent windows. Caulking, on the other hand, is more for those stationary gaps; it’s like this goop that dries hard to seal up cracks.
When applying caulking or weather-stripping:
- I make sure everything’s as clean as possible because dirt means no stick!
- Then I take precise measurements because too much stripping or caulking looks messy.
- Slowly apply them where needed – for caulking using steady pressure on that caulk gun; for weather-stripping smooth it out carefully.
- Last bit – check everything once dry and see if any spots got missed!
This thorough seal-up job isn’t just a once-and-done thing either; checking periodically helps keep things cozy year after year.
Internal Layout Considerations
Okay! With my lean-to greenhouse sealed tight against Mother Nature’s mood swings, my attention goes towards making sure inside everything is… well… perfect! Let’s dive into setting up our plant haven effectively.
- Planning: Before putting anything inside this gardening refuge of mine (because, yes! It feels personal), planning comes first. Sorting out where each plant would be happiest takes some thinking — sunlight lovers near those transparent panels while shade-seekers huddle at the back?
- Shelving Solutions: Shelves are amazing space-savers, plus they add levels that mean happy layered greenery! They’re easy – just measure out wall space, then attach brackets evenly spaced before laying boards across them securely… And poof! Instant layers ready for pots!
But wait – not all shelves need to be stationary or made strictly of wood; how about wire racks? Or maybe adjustable ones so I can tweak heights following plants’ growth?
- Hanging Systems: Speaking of vertical magic – hanging systems! These bring such charm plus utility, too: Hanging baskets hold trailing vine beauties while ceiling hooks paired with macramé holders keep ferns fluttering overhead quite majestically (if you ask me).
Putting these ideas together involves creativity with mindful organization:
- Measure spaces between shelves ensuring pots fit nicely, not snugly.
- Keep heavier pots lower so lifting them isn’t back-breaking work.
- Rotate plants, giving each equal chance at sunshine baths (fairness matters in greenhouses, too!).
Final touches matter as much as starting strong when building greenhouses, especially leaned-against ones because they’re quite unique tucked next to your home braving elements side by side cheekily almost saying “Bring ’em on!” Suspending leafy greens above paired with tiered shelving beneath creates harmony optimizing every inch gently reminding us… “good things come in small packages.”
Also Read: Entry-Level Environmental Jobs: 20 Best Starter Opportunity
Maintenance Tips To Keep Your Lean-To Greenhouse Thriving
If you’ve set up a lean-to greenhouse in your backyard, good on you! These handy little gardening structures are great for growing plants. But just building a greenhouse isn’t enough; you need to take care of it too. Here’s how I keep my green-to greenhouse in tip-top shape so that my plants stay happy and healthy.
Regular Cleaning:
Just like your home, your lean-to greenhouse needs cleaning. Keeping windows clear lets in more light, which is vital for plant growth.
To clean properly, here’s what I do:
- Remove any plant debris like fallen leaves and dead plants.
- Clean the glass or plastic windows with soapy water to keep them clear.
- Disinfect the inside surfaces to prevent disease spread among plants.
Check for Damage:
Wind, rain, and even the sun can damage parts of your greenhouse over time. It’s vital I check my greenhouse regularly for:
- Cracks in the glass or plastic
- Loose panels or fittings
- Rusted or bent frames
Finding these issues early means I can fix them before they get worse.
Control Temperature and Humidity:
Plants love stable conditions, so here’s how I manage mine:
- Use a thermometer to check temperature daily.
- Open vents or use fans if it gets too hot.
- Close vents and use a heater if it gets too cold at night.
Humidity is important too; make sure your plants get enough water but not too much – damp conditions can lead to mold.
Pest Control:
No one likes bugs munching on their plants! That’s why keeping pests away from my lean-to is must-do work.
Here’s what works for me:
- Regularly inspect plants for signs of pests like chewed leaves or sticky residue.
- Use natural pest control methods like introducing beneficial insects that eat pests.
- Keep a tight seal on doors and vents to prevent bugs from sneaking in.
Proper Ventilation:
Good airflow stops diseases from spreading through the greenhouse air:
To ventilate well:
- Open doors and vents during the day when it’s warm out.
- Use fans if there isn’t much wind.
- Close everything up at night to keep warmth inside.
Remembering these tips helps me avoid problems before they start with my lean-to greenhouse!
Conclusion
Building my own lean-to greenhouse was an adventure filled with learning and satisfaction. From carefully picking the ideal spot that receives ample sunlight to deciding on the precise materials and layouts, every step was crucial in creating a sustainable gardening structure.
I understood the value of solid groundwork and stability, ensuring my plants had a sturdy home. By including proper ventilation systems and choosing the best glazing materials, I made sure my plants thrived in their environment all year round. Sealing against harsh weather ensured longevity while organizing the interior space effectively allowed for greater productivity and ease of access.
If you follow these guidelines, you’ll have a functional and beautiful backyard greenhouse serving your gardening passion for years to come.