Are you thinking about going green with your bathroom habits? Interested in a project that’s good for the planet and your wallet? Look no further! I’m talking about setting up a DIY composting toilet, and it’s not as hard as you might think. Imagine having a system that turns your waste into garden gold instead of just flushing it away! Keep reading, and I’ll share the secrets to making this dream a reality.
Building your own composting toilet is totally doable! It all starts with understanding simple biology and how to work with tools and materials you can easily find. By following a straightforward guide like this one, you’ll have a sustainable toilet that saves water, reduces household waste, and improves your environmental footprint—all without breaking the bank.
What You Will Discover Here
- Step-by-step instructions for beginners
- Tricks to make eco-friendly toilets on a budget
- Real ways to help our Earth with every flush
- How-tos for creating toilets that turn poop to plant food
The Fundamentals of Toilet Composting
Composting toilets is a simple and eco-friendly way to deal with human waste. They work by using natural processes to break down waste into usable compost that’s good for the earth.
What Is a Composting Toilet and How Does It Work?
A composting toilet is a type of toilet that turns human waste into useful compost. This process happens without using water. So, unlike regular toilets, it does not flush the waste away to mix with clean water.
How does this toilet work? Here are the steps:
- Add Waste: You go to the bathroom like normal in a composting toilet, then cover it with materials such as sawdust or peat moss.
- Breakdown: Over time, natural processes break down the waste. Helpful tiny bugs and bacteria eat up the waste and change it into simpler stuff.
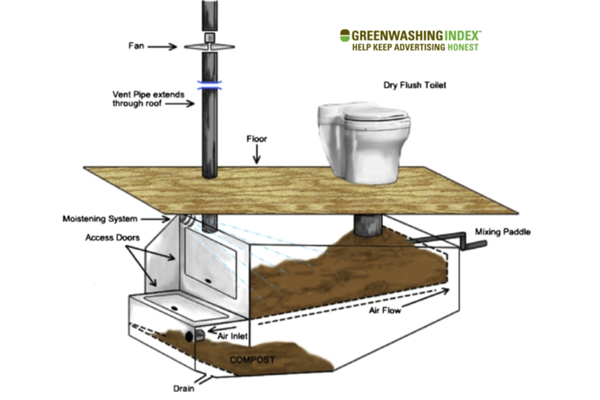
- Evaporate Liquids: These toilets separate liquids from solids. Liquids mostly evaporate and go out through a vent (a small pipe).
- Turn to Compost: The solids turn into compost after some months because of those tiny bugs and natural breakdowns.
You might think: “Doesn’t it smell?” No! If built right and cared for well, it shouldn’t be smelly because of good airflow that helps dry things out.
Why Choose a DIY Composting Toilet?
There are quite a few reasons someone might want to make their own DIY composting toilet:
- Save Water: Normal toilets use lots of water every day. With your DIY composting toilet, you save all that water!
- Help Nature: By making compost, you create rich food for plants without using chemicals.
- Money Saver: You cut costs on your water bill since you’re not flushing away gallons daily.
- Off-grid Living: Perfect for places where there’s no sewer system or if you want to live without relying on public services.
- Be Eco-friendly: It’s way better for our world since you reuse waste instead of sending it off to pollute somewhere else.
So now you know what these eco-friendly toilets are all about: they take care of our human waste in a smart way that helps us save water and live kinder lives toward Mother Earth!
Planning Your DIY Composting Toilet Project
When I set out to build my DIY composting toilet, I knew planning was key. A composting toilet is great for the environment and perfect for folks living off-grid or anyone looking to reduce their ecological footprint. So, where do you start? First things first – finding the ideal spot.

Choosing the Right Location for Your Compost Toilet
Selecting the right location is crucial. Here’s what I considered to pick the best spot:
- Privacy: You want a place that offers enough privacy so no one feels uneasy using it.
- Accessibility: The spot should be easy to get to in all weather conditions – you don’t want a muddy path on a rainy day.
- Proximity: Think about how close it is to your living area – not too close because of the smell, but not too far away that it becomes troublesome to access.
- Sunlight: A bit of sunlight can help with moisture evaporation, but too much might overheat and dry out your compost.
- Ground Stability: Pick solid ground so your toilet stands firm and doesn’t tilt over time.
- Ventilation: Good air flow helps with odor control and speeds up composting.
Figuring out these details before building saved me time and hassle later on.
Materials You Will Need for Constructing Your DIY Toilet
Gathering materials should be about keeping costs low while ensuring durability:
- Structure Materials:
- Plywood or old boards (for building the box or seat)
- Screws or nails (to hold everything together)
- Saw (for cutting wood to size)
- Composting Elements:
- Two buckets or bins (one for use, one for composting ongoingly)
2a Peat moss or sawdust (helps with absorbing liquids and odors)
- Essential Tools:
i) Drill (for making holes in plywood if necessary)
ii) Screwdriver
iii) Hammer - Additional Supplies:
i) Hinges (if making a lid)
ii) Toilet seat
iii) Sealant or caulk (to prevent leaks)
Most materials might already be around your house; otherwise, they can be found at local hardware stores without breaking the bank.
By considering where my DIY toilet would go and what materials I’d need beforehand, I ensured that my eco-friendly toilet would be practical for everyday use while contributing positively to our environment’s health!
Step-by-step Guide to Building Your Own Composting Toilet
Building your own DIY composting toilet can be simple and cost-effective. I’ll show you how to do it in a way that makes sure your homemade eco-friendly toilet is both comfortable and efficient.
Design Considerations for Comfort and Efficiency
When designing your composting toilet, start by thinking about the shape and size. You want to make sure it feels just right when you sit down – not too high or too low. The seat should be at a height that’s comfortable for most people, just like a regular toilet.
Efficiency is key, so design the toilet such that waste falls straight into the compost bin below without making a mess. You’ll also need a way to add sawdust or wood chips after each use; this helps with breaking down waste and keeping things clean.
For sanitation, keep two separate bins: one for pee and one for poo. Urine diverts away from the solid waste, which makes both parts easier to manage and helps with composting.
Here’s what you need to think about:
- A seat at the right height.
- A direct drop of waste into the bin.
- Separate places for liquid and solid waste.
- Easy access to add cover material like sawdust.
Assembling the Foundation: Start with a Solid Base
A stable base keeps your DIY toilet from tipping over or moving around when you use it. Start by building a strong box out of wood that can hold your weight plus the weight of all the materials inside easily.
Make sure everything fits tight together. Use screws instead of nails because screws will stay put better over time.
Before adding any other parts on top, check if:
- The base sits firm on the ground with no wobble.
- All parts are screwed tightly together.
- It can carry heavy weight without bending or breaking.
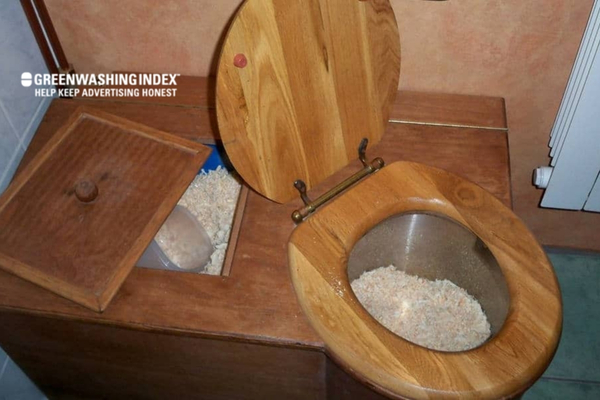
Crafting the Seat and Cover
Now onto arguably one of the most important bits – where you actually sit! A DIY toilet needs an easy-to-clean seat that also shuts tight after you’re done using it.
Use smooth plywood or another comfy yet sturdy material for this part. Cut out an oval hole for the waste, but always sand down any rough edges around where you cut so it’s safe to use.
The cover should fit snugly over this hole to keep flies out and odors in when not in use:
- Measure carefully before cutting anything.
- Sand down all surfaces until they’re nice and smooth.
- Test that everything lines up correctly—seat fits base; cover closes neatly over-seat hole without gaps!
Ventilation Systems Explained
Keeping the air fresh around your eco-friendly toilet is important because nobody likes bad smells!
For good airflow:
- Install a pipe running from near where solid waste collects straight up through your house roof or wall out into the open air outside (this lets out any bad odors safely).
- Put in small vents near floor level on each side of your unit (incoming fresh air pushes smelly air up through the top pipe).
Keep these tips in mind when setting up ventilation:
- Make sure pipes are sealed well so no smell leaks back indoors.
- Angle vent pipes upwards towards the outside exit point—hot air full of odor rises naturally!
- Regularly check vents aren’t blocked so they always work properly.
Following these steps closely will give you a great start on making your very own composting toilet – good luck!
Maintaining Your New Eco-Friendly Fixture
Having built a DIY composting toilet is a great step toward living more sustainably. But once it’s all set up, keeping it clean and working well is key.
The Do’s and Don’ts of Compost Management
Managing hygiene in your composting toilet isn’t hard if you follow these simple tips. Let’s take a look:
Do:
- Add ‘Browns’ after Every Use: Throw in things like sawdust or dry leaves every time you use the toilet to help with the breakdown of waste.
- Wear Gloves: Always put on a pair when managing the compost to keep your hands clean.
- Keep it Dry: Too much water slows down the composting process. If it looks too wet, add more ‘browns’.
- Empty Regularly: Don’t wait until it’s overflowing; empty your DIY toilet when it’s about three-quarters full.
- Clean Often: Use natural cleaners like vinegar to wipe down surfaces without harming the composting process.
Don’t:
- Avoid Chemicals: Don’t use bleach or harsh chemicals that can kill good bacteria doing all the hard work.
- No Plastic Bags: Never line your DIY composting toilet with plastic bags; they won’t break down as organic waste does.
- Limit Heavy Cleaning Products: Strong cleaning products might be good for other toilets but not for an eco-friendly one.
Troubleshooting Common Issues in your DIY Composting Toilet
Even with careful maintenance, you might hit some bumps in the road with your sustainable toilet.
- Moisture Levels: If your eco-friendly toilet looks too wet or smells musty, there may be too much moisture.
- Fix: Mix in more dry materials like sawdust or shredded paper to soak up extra dampness.
- Odor Control: A well-maintained composting toilet shouldn’t smell bad, but if you notice an odor:
- Fix: Make sure you’re adding enough ‘browns’ and emptying the bin frequently enough.
Encountering minor challenges while caring for your off-grid toilet is pretty common at first while getting used to maintaining a DIY system compared to traditional ones, but once accustomed, these issues should become rare over time as long as consistent care is given.
Remember that creating and maintaining a sustainable household fixture is an ongoing learning experience – each issue faced can teach me new ways to improve my system!
Legal Considerations for a Homemade Sanitation System
When you’re thinking about building a DIY composting toilet, it’s very important not to jump in without doing some homework first. One big thing to think about is the law – yes, laws that talk about toilets and where our waste goes!
Understanding Local Sanitation Laws
Before I start sawing wood or buying bins for my DIY toilet, I always make sure to check what the local rules are. You might wonder, “Why bother?” Because these laws keep our homes and communities safe and clean.
Here’s what I do to stay on the right side of the law:
- Get in touch with local authorities: This means calling up my town hall or county office. They know all about the legal stuff.
- Ask questions: When I call, I don’t just say hi and bye! I ask specific questions like, “Can I have a composting toilet in my backyard?” or “Do you have special rules for eco-friendly toilets?”
- Write down everything: While on the call, I take notes so that later on, if someone asks me why my toilet is different, I can show them that I followed all the rules.
- Look for permits: Sometimes, they’ll tell me that I need a permit before building anything new in my house – this includes sustainable toilets.
- Check health regulations: Health departments can be really picky because no one wants bad germs spreading around! They might have extra rules for how far away from homes or water sources your DIY toilet needs to be.
Remember: just because it’s an off-grid toilet doesn’t mean it’s off-limits from rules!
Doing this kind of check-up isn’t just something extra—it is must-do homework! Even though we want to help Earth by being green and clean with an eco-friendly toilet, we’ve also got to make sure we’re not messing up anything else along the way.
FAQs
Are there any health risks associated with using or building a DIY composting toilet?
If you build and use a DIY composting toilet properly, there shouldn’t be health risks. It’s key to manage waste well and to wash your hands after use.
Could I retrofit my existing bathroom into a space suitable for a ‘DIY toilet’?
Yes, you can turn your current bathroom into a space for a DIY composting toilet with some changes. Just make sure you have room for the separate waste compartments.
How often should I empty my homemade compost chamber?
Emptying times vary based on the size and use of the chamber. Generally, every few months is standard, but it’s best to check regularly and maintain it well.
Conclusion
Building my own DIY composting toilet was an empowering journey toward sustainable living. It wasn’t just about saving money or being eco-friendly; it also symbolized taking responsibility for my waste in a world where resources are precious. Every step, from understanding how a composting toilet works to the actual building process, was filled with learning experiences that made me appreciate this simple yet effective system.
By embracing the DIY spirit and following guidelines for design, assembly, and maintenance, I constructed not just an off-grid toilet but a statement of environmental care. This project demonstrated that we can all contribute to sustainability in our daily lives—one flush at a time.