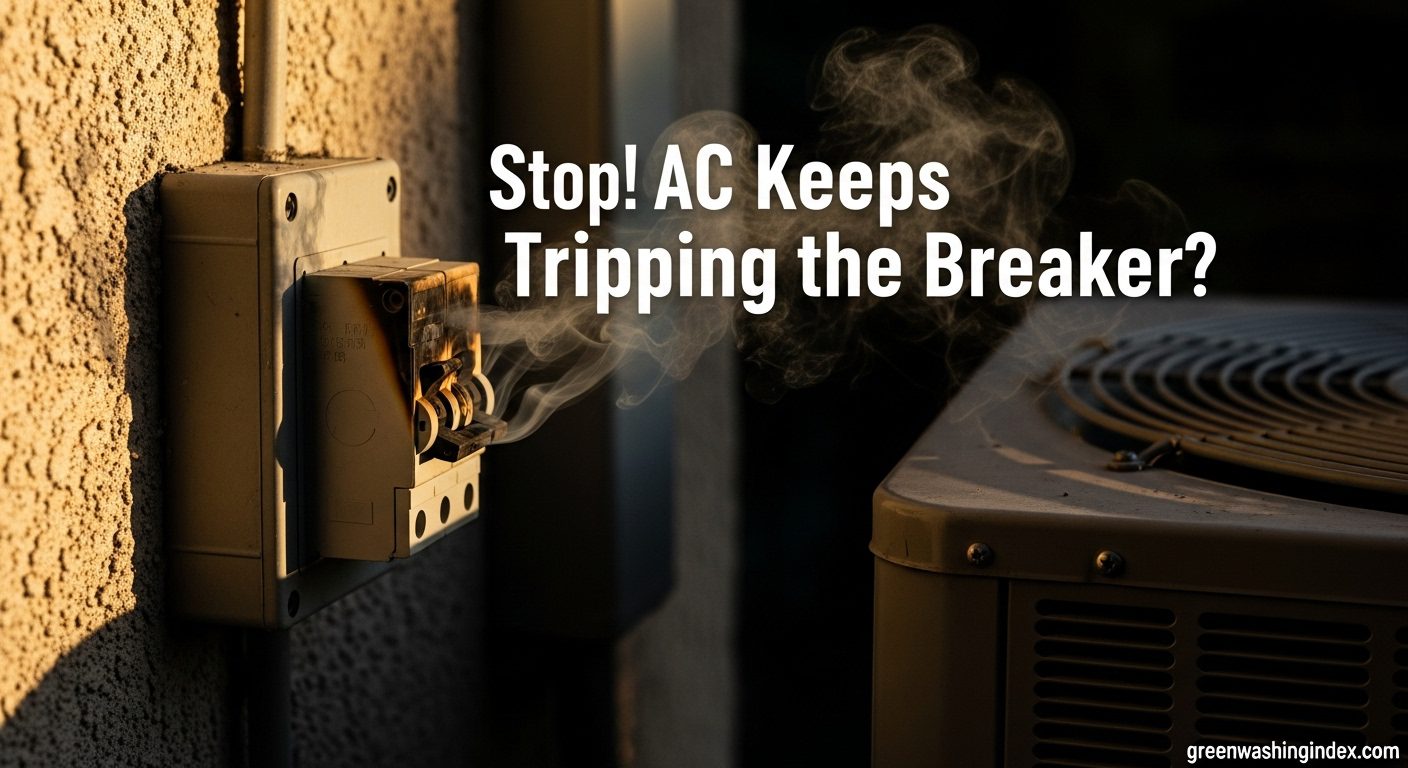

Whether you’re dealing with hot spots in summer or cold zones in winter, mini split heating and cooling systems offer a revolutionary solution that’s changing how homeowners think about climate control. Traditional HVAC systems waste energy through ductwork, lack room-by-room control, and often leave certain areas uncomfortable.
Mini split heating and cooling systems are ductless heat pumps that provide both heating and cooling through wall-mounted units, offering up to 60% energy savings compared to traditional systems while giving you precise temperature control in each room. This comprehensive guide covers everything from how mini splits work and their costs to installation, maintenance, brand comparisons, and maximizing energy savings with available rebates.
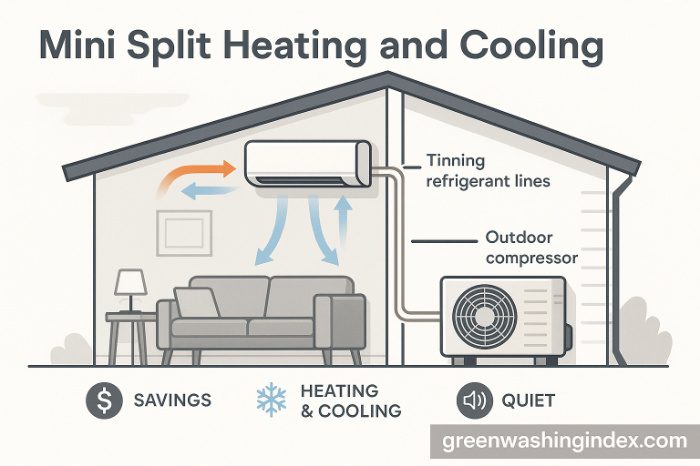
A mini split system is a type of ductless heat pump that provides efficient heating and cooling without the need for traditional ductwork. Unlike central air systems that lose energy through ducts, mini splits deliver conditioned air directly to individual rooms or zones, making them an increasingly popular choice for modern homes.
Every mini split system consists of two main components connected by a conduit. The outdoor unit houses the compressor and condenser, handling the heavy lifting of the heat transfer process. The indoor unit, typically mounted on a wall, contains the air handler that distributes heated or cooled air throughout the space.
These components connect through a 3-inch conduit that contains refrigerant lines, power cables, and a condensate drain. This slim connection means installers only need to drill a small hole through your wall, avoiding the major construction required for ductwork installation.
Mini splits operate on the same principle as traditional air conditioners but with a crucial difference. In cooling mode, they extract heat from inside your home and transfer it outside. The magic happens when you switch to heating mode, the system reverses, pulling heat from outdoor air (even in cold weather) and bringing it inside.
The refrigerant cycles through the system, changing from liquid to gas and back again. This phase change allows the system to absorb and release heat efficiently. Advanced inverter technology in modern mini splits adjusts the compressor speed to match your exact heating or cooling needs, rather than simply turning on and off like traditional systems.
Single-zone mini splits feature one indoor unit connected to one outdoor unit, perfect for conditioning a specific room or area. These systems work ideally for home additions, converted garages, or solving comfort issues in problem rooms that your central system can’t adequately reach.
Multi-zone systems connect multiple indoor units (typically 2-6) to a single outdoor unit. Each indoor unit operates independently with its own temperature control, allowing you to heat your living room to 72°F while keeping bedrooms at a cooler 68°F. This flexibility makes multi-zone systems excellent for whole-home solutions or larger spaces requiring varied temperature control.
| Feature | Single-Zone | Multi-Zone | Central Air |
| Installation Cost | $3,000-$5,000 | $6,000-$15,000 | $5,000-$10,000 |
| Energy Efficiency | Highest | High | Moderate |
| Zone Control | One room | Multiple rooms | Whole house only |
| Installation Time | 4-8 hours | 1-3 days | 2-5 days |
| Ductwork Required | No | No | Yes |
Mini split systems deliver advantages that go far beyond simple temperature control. Understanding these benefits helps explain why millions of homeowners are making the switch from traditional HVAC systems.
The numbers speak for themselves. ENERGY STAR certified mini splits use up to 60% less energy than standard home electric radiators and baseboard heaters. When compared to traditional ducted systems, you’ll save 30% or more on heating and cooling costs by eliminating duct losses.
These savings stem from several factors. First, no ductwork means no energy lost through leaks or poor insulation, a problem that wastes 20-30% of energy in typical central systems. Second, inverter technology allows the system to run continuously at lower speeds rather than cycling on and off, maintaining steady temperatures more efficiently. Third, zone control means you’re only heating or cooling occupied spaces, not empty rooms.
Imagine ending thermostat wars forever. With mini splits, each family member can set their preferred temperature in their own space. The home office stays cool at 68°F for productivity, while the living room maintains a cozy 72°F for relaxation.
This zoning capability extends beyond personal preference. You can reduce energy use in guest rooms, turn off unused areas entirely, or provide extra cooling to sun-facing rooms that tend to overheat. Smart controls and scheduling features let you automate these adjustments based on your daily routines.
Mini splits redefine what quiet comfort means. Indoor units operate at 20-49 decibels, quieter than a library or soft whisper. Outdoor units run at 45-60 decibels, comparable to moderate rainfall. Compare this to window units that often exceed 70 decibels or central systems with noisy ductwork.
The secret lies in advanced fan design and sound-dampening technology. Variable-speed compressors eliminate the jarring start-stop noise of traditional systems. Many users report forgetting their mini split is even running, enjoying comfort without the constant background hum.
Without ducts collecting dust, mold, and allergens, mini splits naturally provide cleaner air. Each indoor unit includes multi-stage filtration that you can easily access and clean monthly. This regular maintenance is far simpler than professional duct cleaning required for central systems.
Many models include advanced filtration options like activated carbon filters for odor control or HEPA-style filters for allergy sufferers. The lack of ductwork also eliminates the possibility of pest infestations or mold growth in hard-to-reach areas.
Modern mini splits are true heat pumps, providing both heating and cooling from a single system. In heating mode, they’re 2-4 times more efficient than electric furnaces or baseboard heaters. This dual functionality means one installation, one system to maintain, and year-round comfort from the same equipment.
Cold climate models now perform efficiently even at 5°F or below, making them viable primary heating sources in northern regions. The ability to both heat and cool makes mini splits particularly valuable in moderate climates where you need both functions but neither dominates your annual energy use.
Choosing the right mounting style for your mini split affects both aesthetics and performance. Each option offers unique advantages depending on your room layout and design preferences.
Wall-mounted units dominate the mini split market for good reason. Installed 6-8 inches below the ceiling, they provide optimal air distribution as cool air naturally falls and warm air rises. Their elevated position keeps them out of the way while maintaining easy access for filter cleaning.
Modern wall units feature sleek designs that blend with contemporary decor. Many manufacturers offer multiple color options beyond basic white, and some premium models like LG’s Art Gallery series let you customize the appearance with changeable frames or artwork panels.
Ceiling cassettes mount flush with your ceiling, leaving only a decorative grille visible. These units distribute air in four directions, providing more even temperature distribution than wall units. They work exceptionally well in large, open spaces or rooms with limited wall space.
Installation requires adequate ceiling space, typically 10-12 inches, making them ideal for homes with drop ceilings or accessible attic space. While installation costs more than wall units, the nearly invisible appearance appeals to design-conscious homeowners.
Floor-mounted units install at floor level, similar to traditional radiators. They work well in rooms with limited wall space, large windows, or slanted ceilings. Heat rises naturally from floor level, providing comfortable warmth without the drafts sometimes associated with ceiling-level heating.
Floor-standing units offer even more flexibility, requiring no wall mounting at all. These portable-style units can be repositioned as needed, though they still require permanent refrigerant line connections. They’re perfect for sunrooms, enclosed porches, or spaces where wall mounting isn’t practical.
Ducted mini splits offer a middle ground between traditional central air and ductless systems. These units hide in ceilings or closets, distributing air through short duct runs to multiple rooms. While they sacrifice some efficiency compared to completely ductless options, they maintain the aesthetic appeal of invisible air distribution.
These systems work well for conditioning multiple small rooms from one unit, such as several bedrooms along a hallway. They also allow you to add mini split efficiency to existing homes with some ductwork while avoiding the cost of a complete duct system.
| Mounting Type | Best For | Visibility | Installation Cost | Air Distribution |
| Wall-Mounted | Most rooms | Visible unit | $ | Good |
| Ceiling Cassette | Large spaces | Nearly hidden | $$$ | Excellent |
| Floor-Mounted | Rooms with limited walls | Visible unit | $$ | Good |
| Ducted | Multiple small rooms | Completely hidden | $$$$ | Very Good |
Understanding mini split costs requires looking beyond the initial price tag. Let’s break down all expenses involved, from equipment to installation to long-term savings.
Mini split equipment prices vary based on capacity (measured in BTUs) and the number of zones. Single-zone systems start around $800 for basic 9,000 BTU units, while high-efficiency 24,000 BTU models can reach $3,000. Multi-zone systems range from $2,000 for dual-zone setups to $6,000 or more for five-zone configurations.
BTU requirements depend on room size, climate, and insulation quality. A typical 12,000 BTU unit handles 400-600 square feet, while 24,000 BTU models can condition 1,000-1,400 square feet. Choosing the right size is crucial, oversized units cycle frequently, reducing efficiency and comfort.
Professional installation typically costs $2,000-$5,000 for single-zone systems and $5,000-$10,000 for multi-zone setups. Several factors influence these costs:
Electrical work represents a significant variable. Many mini splits require 230-volt circuits, meaning homes with only 115-volt service need electrical upgrades. Distance between indoor and outdoor units affects cost, as longer refrigerant lines require more materials and labor. Wall construction matters too, running lines through brick or concrete costs more than wood frame walls.
Geographic location impacts pricing significantly. Installation in high-cost areas like New York or San Francisco may cost 50% more than rural locations. Always obtain multiple quotes and verify contractors hold proper HVAC licenses and insurance.
Mini splits shine when comparing operating costs. A typical household spending $1,900 annually on energy bills can cut heating and cooling costs by 30-60%. For homes currently using electric resistance heating, savings often exceed $1,000 per year.
Real-world example: Replacing electric baseboard heat with a mini split in a 1,500 square foot home typically saves $800-$1,200 annually. Even compared to central air conditioning, eliminating duct losses saves $300-$500 yearly. These savings accelerate in homes where zone control prevents heating or cooling unused spaces.
The federal government offers up to $2,000 in tax credits for qualifying mini split installations through 2032. This credit applies to both equipment and installation costs, effectively reducing your total investment by 30% up to the maximum credit amount.
Many utilities offer additional rebates ranging from $300-$1,500 per system. Some states provide their own incentives, Massachusetts, for example, offers up to $10,000 for whole-home heat pump conversions. Check the ENERGY STAR rebate finder for current programs in your area.
ROI Calculation Example:
Proper sizing ensures optimal comfort and efficiency. An incorrectly sized system wastes energy, provides poor comfort, and wears out prematurely.
BTU (British Thermal Unit) ratings indicate how much heat a system can move per hour. One ton of cooling equals 12,000 BTUs. While rules of thumb suggest 20 BTUs per square foot, numerous factors affect actual requirements.
Room usage matters significantly. Kitchens require extra capacity due to appliance heat, while bedrooms often need less. Sun exposure adds 10% to south-facing rooms, while shaded northern exposures may need 10% less capacity. Ceiling height beyond 8 feet requires proportionally more BTUs.
Professional HVAC contractors use Manual J calculations to determine exact heating and cooling loads. This comprehensive assessment considers:
While online calculators provide estimates, Manual J calculations offer precision. Many manufacturers void warranties if systems are significantly oversized, making professional sizing worthwhile for expensive installations.
Standard mini splits work efficiently down to about 20°F but lose capacity as temperatures drop. Cold climate models maintain full heating capacity at 5°F and continue operating at -13°F or lower. These enhanced models cost 20-30% more but provide reliable heating in northern climates.
Cold climate features include:
For areas experiencing temperatures below 20°F regularly, cold climate models ensure consistent comfort without backup heat sources.
Beyond square footage, insulation quality dramatically affects sizing needs. Well-insulated homes with modern windows may need 30% less capacity than older homes with poor insulation. Here’s a practical sizing guide:
| Room Size | Poor Insulation | Average Insulation | Excellent Insulation |
| 150-300 sq ft | 7,000 BTU | 6,000 BTU | 5,000 BTU |
| 300-500 sq ft | 12,000 BTU | 9,000 BTU | 7,000 BTU |
| 500-700 sq ft | 18,000 BTU | 15,000 BTU | 12,000 BTU |
| 700-1,000 sq ft | 24,000 BTU | 20,000 BTU | 16,000 BTU |
| 1,000-1,400 sq ft | 30,000 BTU | 24,000 BTU | 20,000 BTU |
Whether choosing DIY or professional installation, understanding the process helps ensure success and avoid common pitfalls.
DIY mini split kits promise savings of $2,000-$5,000 in labor costs. These systems come pre-charged with refrigerant and include detailed instructions. Handy homeowners with basic electrical knowledge successfully complete single-zone installations in 8-12 hours.
However, DIY installation has significant drawbacks. Most manufacturers limit warranties to 1-5 years for DIY installs versus 10-12 years for professional installation. Mistakes in refrigerant handling, electrical connections, or drainage can cause immediate failure or long-term problems. Many areas require licensed HVAC contractors for refrigerant work and permits.
Professional installation follows a systematic process ensuring optimal performance:
Day 1 begins with mounting the indoor unit bracket, ensuring level installation for proper drainage. Installers drill a 3-inch hole through the exterior wall, angling slightly downward for condensate drainage. They then mount the outdoor unit on a concrete pad or wall bracket, maintaining manufacturer-specified clearances.
Next comes running the line set, copper refrigerant tubes, electrical wiring, and drain line bundled together. Installers carefully route these lines, avoiding sharp bends that restrict refrigerant flow. They connect electrical power, often requiring a new circuit breaker and disconnect box.
The critical final step involves evacuating air from refrigerant lines using a vacuum pump, then releasing refrigerant from the outdoor unit or adding refrigerant if lines exceed standard length. Technicians verify proper operation in both heating and cooling modes before commissioning the system.
Most mini splits require 230-volt electrical service, though smaller 9,000-12,000 BTU units may operate on standard 115-volt circuits. The electrical demands include:
Electrical work often represents 25-40% of installation cost, especially in older homes requiring panel upgrades. Homes with 100-amp service may need upgrading to 200-amp panels when installing multi-zone systems.
Line sets connect indoor and outdoor units, carrying refrigerant that makes cooling and heating possible. Standard kits include 15-25 feet of pre-insulated copper tubing. Longer runs remain possible but require additional refrigerant and reduce efficiency slightly.
Proper installation prevents future problems:
Indoor unit placement affects both comfort and efficiency. Mount units on interior walls when possible, avoiding exterior walls that gain/lose heat. Center units in rooms for even air distribution, keeping them away from heat sources like TVs or lamps that confuse temperature sensors.
Outdoor units need adequate airflow and service access. Maintain minimum clearances:
Installation Checklist:
The mini split market offers numerous options, but certain brands consistently deliver superior performance, reliability, and value.
Mitsubishi Electric remains the gold standard for mini split systems. Their M-Series and P-Series units offer industry-leading efficiency with SEER ratings up to 33.1. Hyper-Heating models deliver 100% heating capacity at 5°F outdoor temperatures, making them ideal for cold climates.
Key advantages include whisper-quiet operation (as low as 19 dB), advanced filtration systems, and the kumo cloud app for smart home integration. Mitsubishi’s i-see Sensor technology scans rooms for hot/cold spots, automatically adjusting airflow for optimal comfort. While premium-priced, their 12-year warranty and legendary reliability justify the investment for many homeowners.
Pioneer disrupted the mini split market by offering contractor-grade quality at DIY-friendly prices. Their systems include everything needed for installation, even the line set cover and installation manual DVD. With prices 40-50% below premium brands, Pioneer makes mini split technology accessible to budget-conscious homeowners.
Don’t mistake low prices for poor quality. Pioneer units achieve respectable 20-22 SEER ratings and include inverter technology for efficient operation. Their customer service excels at supporting DIY installers, and replacement parts remain readily available. The 5-year warranty on DIY installs beats most competitors’ DIY coverage.
Daikin’s cold climate heat pumps excel where others struggle. Their Aurora series maintains full capacity at -4°F and continues heating at -25°F. This exceptional low-temperature performance comes from advanced vapor injection technology and specialized compressor design.
Beyond cold weather performance, Daikin offers excellent humidity control and quiet operation. Their units feature built-in WiFi control and work with most smart home systems. The combination of Japanese engineering and North American support makes Daikin a top choice for harsh winter climates.
LG brings innovation with features like their Art Cool Gallery customizable appearance and advanced air purification. Their dual inverter technology provides exceptional efficiency and quiet operation. Fujitsu offers professional-grade systems with excellent contractor support and training. Senville provides budget-friendly options with surprisingly good performance and customer service.
| Brand | SEER Range | Warranty | Key Strength | Price Range |
| Mitsubishi | 20-33.1 | 12 years | Reliability & Efficiency | $$$$ |
| Pioneer | 17-22 | 5-7 years | Value & DIY Support | $ |
| Daikin | 19-24.5 | 12 years | Cold Climate Performance | $$$ |
| LG | 20-28 | 10 years | Innovation & Design | $$$ |
| Fujitsu | 21-33 | 12 years | Contractor Support | $$$ |
| Senville | 19-23 | 10 years | Budget-Friendly | $$ |
Proper maintenance extends system life and maintains peak efficiency. Most tasks require only basic tools and 30 minutes monthly.
Monthly tasks keep your system running smoothly. Clean or rinse indoor unit filters, the most critical maintenance item. Dirty filters reduce airflow, decrease efficiency, and can cause system shutdown. Check condensate drains ensuring water flows freely, preventing overflow and water damage.
Quarterly maintenance includes cleaning the outdoor unit coil with a garden hose, removing leaves and debris. Trim vegetation maintaining 24-inch clearance around the unit. Inspect refrigerant lines for damage or missing insulation, addressing issues promptly.
Annual professional maintenance, while not mandatory, catches problems early. Technicians check refrigerant charge, test electrical connections, and measure system performance. This $150-$200 service often pays for itself through improved efficiency and prevented breakdowns.
Filter maintenance varies by usage and environment. In typical residential settings, clean filters monthly during heavy use seasons. Homes with pets, smokers, or high dust levels need bi-weekly cleaning. Most filters rinse clean with warm water, avoid harsh chemicals that damage filter material.
Replacement schedules depend on filter type:
Understanding common issues helps diagnose problems quickly:
Unit Won’t Start: Check circuit breakers and disconnect switches first. Verify the remote control has fresh batteries and is set to the correct mode. Some units have minimum temperature differentials, they won’t start if room temperature is too close to the set point.
Poor Cooling/Heating: Dirty filters cause 80% of performance complaints. After cleaning filters, check for blocked outdoor unit coils. Verify all windows and doors are closed, as mini splits can’t overcome major air leaks.
Water Dripping: Condensate drain blockages cause most water leaks. Clear drains with compressed air or a wet/dry vacuum. Check that indoor units remain level, settling or improper installation causes drainage problems.
Unusual Noises: Clicking during startup is normal as plastics expand. Continuous rattling suggests loose panels or debris in the fan. Refrigerant gurgling occasionally occurs during defrost cycles but shouldn’t persist.
Certain problems require professional expertise:
Seasonal Maintenance Checklist:
Spring:
Summer:
Fall:
Winter:
Understanding efficiency ratings helps you choose systems that minimize operating costs while maximizing comfort.
SEER (Seasonal Energy Efficiency Ratio) measures cooling efficiency. Higher numbers mean greater efficiency, and lower operating costs. Modern mini splits achieve 20-33 SEER ratings, compared to 13-16 SEER for typical central systems. Each SEER point improvement saves approximately 5% on cooling costs.
SEER2, introduced in 2023, uses updated testing procedures reflecting real-world conditions better. SEER2 ratings run about 4.5% lower than original SEER ratings for the same equipment. When comparing older and newer models, factor in this difference.
HSPF (Heating Season Performance Factor) rates heating efficiency. Mini splits typically achieve 9-13 HSPF ratings. For comparison, electric resistance heating equals 3.4 HSPF, making heat pumps 2-4 times more efficient. Cold climate models may show lower HSPF ratings but deliver better real-world performance in freezing conditions.
ENERGY STAR certification guarantees independently verified efficiency meeting strict EPA guidelines. Certified mini splits use up to 60% less energy than standard models, translating to hundreds in annual savings. Beyond energy savings, certification ensures:
Standard efficiency ratings don’t tell the whole story in cold climates. Look for cold climate heat pump (ccHP) specifications showing performance at various temperatures:
Top cold climate models maintain 70-100% capacity at 5°F, ensuring comfort without backup heat. Compare these specifications when choosing systems for areas with significant heating demands.
Modern mini splits integrate with smart home systems, enabling advanced control strategies that boost efficiency:
Scheduling: Program different temperatures for sleep, work, and active hours. Unlike traditional systems, mini splits efficiently maintain set temperatures rather than recovering from setbacks.
Geofencing: Systems detect when you leave home, automatically adjusting temperatures for savings. They return to comfort settings as you approach, ensuring perfect temperatures upon arrival.
Zone Coordination: Smart controls prevent adjacent zones from fighting each other, one heating while another cools. This coordination can save 10-15% on multi-zone systems.
Energy Monitoring: Track usage patterns identifying opportunities for savings. Some utilities offer time-of-use rates where smart controls shift usage to cheaper periods.
| SEER Rating | Annual Cooling Cost* | 10-Year Savings vs 13 SEER |
| 13 SEER | $400 | , |
| 16 SEER | $325 | $750 |
| 20 SEER | $260 | $1,400 |
| 25 SEER | $208 | $1,920 |
| 30 SEER | $173 | $2,270 |
*Based on 3-ton system, average electricity rates
Learning from others’ mistakes saves money and frustration. Here are the most costly errors homeowners make:
Oversizing remains the most common and damaging mistake. An oversized system cools rooms too quickly, shutting off before removing humidity. This “short cycling” creates uncomfortable, clammy conditions while increasing energy use and wearing equipment prematurely.
Undersizing creates opposite problems, systems run continuously trying to meet demand, never achieving set temperatures. This constant operation increases energy costs and shortens equipment life. Trust Manual J calculations over rules of thumb, and when in doubt, err slightly toward undersizing rather than oversizing.
Indoor unit placement dramatically affects comfort and efficiency. Installing units near heat sources like TVs or in direct sunlight confuses temperature sensors, causing overcooling. Placing units in corners or behind furniture restricts airflow, reducing effectiveness.
Outdoor unit mistakes prove equally problematic. Installing under dripping eaves causes ice damage in winter. Placing units in enclosed areas restricts airflow, reducing efficiency 20% or more. North-side placement minimizes sun exposure but may increase snow accumulation requiring more frequent clearing.
Skipping filter cleaning ranks as the simplest yet most damaging maintenance failure. Dirty filters reduce airflow 50% or more, forcing systems to work harder while providing less comfort. This neglect increases energy use 25% and can cause premature compressor failure, a $1,500+ repair.
Ignoring outdoor unit cleaning compounds problems. Cottonwood seeds, leaves, and grass clippings clog coils, reducing heat transfer. This efficiency loss translates to 20-30% higher operating costs and shortened equipment life.
Standard mini splits lose significant capacity below 30°F, struggling to heat homes when needed most. Homeowners in cold climates who choose standard models often need expensive backup heating, negating efficiency benefits.
Cold climate models cost only 20-30% more while providing reliable heating at sub-zero temperatures. The extra investment pays back quickly through eliminated backup heating costs and improved comfort during cold snaps.
Assuming existing electrical service handles mini split loads causes installation day surprises. That unused 240V outlet might be on a shared circuit, unable to handle mini split demands. Older homes with 60-100 amp service may need complete panel upgrades.
Planning electrical work during initial budgeting prevents cost overruns. Factor in dedicated circuits, possible panel upgrades, and outdoor disconnect requirements. Address electrical needs during construction projects when walls are open, saving thousands versus retrofit installation.
Understanding how mini splits compare to alternatives helps make informed decisions based on your specific needs.
Central air conditioning distributes cooled air through ductwork to every room simultaneously. This whole-house approach works well for consistent cooling needs but lacks flexibility. Mini splits excel at customized comfort, allowing different temperatures in different rooms while using 30% less energy by eliminating duct losses.
Installation differs dramatically. Central air requires extensive ductwork in unconditioned spaces, a major undertaking in existing homes. Mini splits need only a 3-inch hole between indoor and outdoor units, making retrofit installation far simpler. However, central air provides that invisible aesthetic some homeowners prefer, with no visible indoor units.
Window air conditioners offer low upfront costs and easy installation but fall short in nearly every other metric. They’re 50% less efficient than mini splits, create security vulnerabilities, block natural light, and generate 70+ decibel noise levels. Window units also only cool, requiring separate heating solutions.
Mini splits cost more initially but deliver year-round comfort at whisper-quiet sound levels. They preserve windows for light and views while providing 2-3 times the efficiency of window units. For anything beyond temporary cooling needs, mini splits prove more economical long-term.
Portable air conditioners seem convenient but hide significant drawbacks. They’re the least efficient cooling option available, using 40% more energy than mini splits for equivalent cooling. The required exhaust hose creates negative pressure, pulling hot outdoor air into your home through every crack and gap.
Mini splits avoid these problems entirely with permanent installation that doesn’t compromise your building envelope. While less flexible than portables, mini splits deliver 3-4 times the efficiency with far superior comfort and noise levels.
Traditional split system heat pumps share mini splits’ efficient heating and cooling capabilities but require ductwork for air distribution. This makes them excellent for new construction but challenging retrofits. Duct losses reduce their efficiency advantage, though they still outperform furnaces and air conditioners.
The choice often comes down to existing infrastructure. Homes with quality ductwork may benefit from traditional heat pumps’ whole-house capability and invisible air distribution. Homes without ducts find mini splits more practical, avoiding the $5,000-15,000 cost of duct installation.
| System Type | Installation Cost | Operating Cost | Efficiency | Best For |
| Mini Split | $$$ | $ | Excellent | Zoned comfort, retrofits |
| Central Air | $$$$ | $$ | Good | Whole-house, existing ducts |
| Window Unit | $ | $$$$ | Poor | Temporary, rentals |
| Portable AC | $$ | $$$$$ | Very Poor | Temporary solutions |
| Traditional Heat Pump | $$$$ | $$ | Very Good | New construction |
Quality mini split systems typically last 15-20 years with proper maintenance, exceeding the 10-15 year lifespan of traditional central air systems. Premium brands like Mitsubishi and Daikin often surpass 20 years. The key to longevity lies in regular filter cleaning, annual professional maintenance, and protecting outdoor units from physical damage.
Indoor units generally outlast outdoor units since they face less weather exposure. When outdoor units eventually fail, you can often replace just that component, saving significant money versus full system replacement.
Modern cold climate mini splits maintain heating capacity down to -13°F or lower. These specialized units use enhanced vapor injection, base pan heaters, and optimized refrigerants to extract heat from frigid outdoor air. While efficiency decreases at extreme temperatures, they still outperform electric resistance heating by 200-300%.
For climates regularly experiencing sub-zero temperatures, pair cold climate mini splits with minimal backup heat for the coldest days. This hybrid approach provides reliable comfort while maintaining superior annual efficiency.
Yes, mini splits excel at dehumidification. During cooling operation, they remove moisture like any air conditioner. However, mini splits offer “dry mode” or “dehumidification mode” that removes moisture without significantly cooling the space, perfect for humid but mild days.
Advanced models can maintain specific humidity levels automatically. This capability makes mini splits ideal for basements, coastal homes, or any space where humidity control matters as much as temperature.
Multi-zone mini splits can absolutely handle whole-house climate control. A properly designed system with 4-6 indoor units matches or exceeds central system comfort while providing room-by-room temperature control. The key lies in proper sizing and strategic placement to ensure adequate air circulation.
Consider mini splits especially strong candidates for:
Inverter mini splits adjust compressor speed to match heating/cooling demands, like a car’s cruise control maintaining speed. Non-inverter models only run at full speed or off, like driving by alternating between full throttle and braking.
Inverter technology delivers:
While inverter models cost more initially, energy savings typically recover the difference within 2-3 years.
DIY installation is possible with pre-charged mini split kits designed for homeowners. These systems include detailed instructions and require basic tools plus electrical knowledge. Single-zone installations take competent DIYers 8-12 hours.
However, consider these factors:
Mini split heating and cooling systems offer unmatched efficiency, comfort control, and year-round climate management, making them ideal for both whole-home solutions and targeted room conditioning. With energy savings of 30-60% compared to traditional systems, whisper-quiet operation, and the flexibility of zone control, mini splits represent the future of home comfort.
The combination of federal tax credits up to $2,000, utility rebates, and dramatic energy savings makes mini split installation a smart financial decision. Whether you’re replacing an aging system, adding comfort to problem rooms, or building new, mini splits deliver superior performance that pays dividends for decades.
Calculate your potential savings with an ENERGY STAR certified mini split system and explore available rebates in your area to start your journey toward efficient home comfort. With proper sizing, professional installation, and minimal maintenance, your mini split system will provide reliable, efficient comfort through every season.
Don't let aphids, slugs, and caterpillars ruin another plant. Take back control with simple, natural methods that actually work.
