

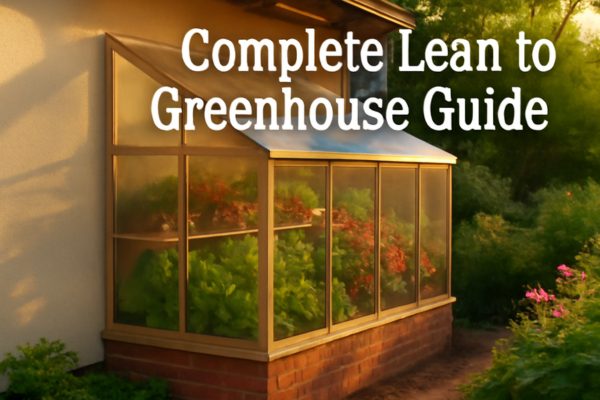
Transform that unused wall space into a thriving garden oasis with a lean to greenhouse. Whether you’re dreaming of fresh vegetables in winter or need a cozy spot for seedlings, this attached structure offers the perfect solution for space-conscious gardeners.
A lean-to greenhouse is simply a greenhouse structure that shares one wall with an existing building, typically your house, garage, or shed. This against wall greenhouse design saves money on materials, provides natural insulation, and makes accessing your plants incredibly convenient—especially during harsh weather.
In this comprehensive guide, you’ll discover everything from simple lean to greenhouse plans to material comparisons and cost breakdowns. We’ll walk you through the entire process, from initial planning to year-round growing success, ensuring you have all the knowledge needed to create your perfect garden sanctuary.
A leanto greenhouse represents one of the most efficient ways to extend your growing season while maximizing limited space. These structures attach directly to an existing wall, creating a protected environment that benefits from both solar gain and the thermal mass of the adjoining building.

The fundamental difference lies in structural support and heat retention. While freestanding greenhouses require four walls and independent support, lean-to greenhouse designs utilize an existing wall for both stability and insulation.
Freestanding units offer 360-degree sun exposure and placement flexibility. However, they typically cost 30-40% more due to additional materials and lose heat more rapidly through all four walls.
Leaning greenhouses excel in smaller spaces and provide easier utility connections. The shared wall acts as a heat sink, absorbing warmth during the day and releasing it at night, creating more stable temperatures for your plants.
The advantages of building against an existing structure extend far beyond simple cost savings. Your home’s wall provides natural wind protection, reducing stress on the greenhouse frame during storms.
Energy efficiency stands out as a major benefit. The shared wall can reduce heating costs by up to 30% compared to freestanding models, making year-round growing more affordable and sustainable.
Access to utilities becomes remarkably simple when your greenhouse sits adjacent to your home. Running water lines, electricity for grow lights, or even drawing warm air from your house requires minimal effort and expense.
Small lean to greenhouse designs work perfectly for urban gardeners with limited yard space. If you have a south-facing wall and just 6-8 feet of ground space, you can create a productive growing area.
Beginners often find lean-to structures less intimidating than larger projects. The simplified construction and reduced material needs make this an ideal first greenhouse project for DIY enthusiasts.
Serious gardeners appreciate how these structures can serve multiple purposes. Beyond plant cultivation, many convert their lean-to greenhouse diy projects into breakfast nooks, reading spaces, or stunning garden rooms that enhance home value.
Successful greenhouse construction begins with thorough planning. Taking time to consider location, size, and legal requirements now prevents costly mistakes and ensures optimal growing conditions for years to come.
South-facing walls provide maximum sunlight exposure, receiving 6-8 hours of direct light daily—essential for healthy plant growth. East-facing locations work well for morning sun lovers, while west-facing spots suit heat-tolerant plants.
Consider existing features like roof overhangs, trees, or neighboring structures that might cast shadows. Even partial shade can significantly impact your greenhouse’s performance, especially during winter months when sun angles are low.
Proximity to water sources and electrical outlets influences both construction costs and daily convenience. Planning pathways for easy access during muddy seasons ensures you’ll actually use and enjoy your greenhouse year-round.
The ideal size balances available space with intended use. A 6×8 foot structure provides ample room for hobby gardening, while serious growers might prefer 8×12 foot or larger designs.
Height considerations matter just as much as floor space. Standard designs offer 6-7 feet of clearance at the peak, but low-roof bungalows might require modified simple lean to greenhouse plans with reduced ridge heights.
Remember to account for interior workspace. Many builders focus solely on growing area but forget they need room to move comfortably, especially when carrying trays or watering cans.
Local building codes vary significantly, with some areas requiring permits for any structure over 100 square feet. Contact your local planning department before breaking ground to avoid potential fines or forced removal.
Setback requirements often dictate minimum distances from property lines. Even though you’re building against your own structure, side yard setbacks might limit your greenhouse’s potential width.
Some homeowners associations have specific rules about greenhouse aesthetics or placement. Getting written approval beforehand prevents neighborhood disputes and ensures your project proceeds smoothly.
Most vegetables and flowers require 6-8 hours of direct sunlight for optimal growth. Use a sun calculator app or observe your planned location throughout a full day to verify adequate exposure.
Winter sun angles differ dramatically from summer patterns. A location that seems perfect in July might receive minimal light during December, when you need it most for winter growing.
Consider installing shade cloth for summer months when intense afternoon sun can overheat your greenhouse. Planning for seasonal adjustments ensures year-round growing success.
Selecting quality materials determines your greenhouse’s longevity, maintenance requirements, and overall performance. Understanding the pros and cons of each option helps you make informed decisions that match your budget and climate.
Wood frames offer traditional aesthetics and easy customization. Cedar naturally resists rot and insects, though it costs more than pressure-treated pine. Wood frames require periodic staining or sealing but provide excellent insulation.
Aluminum frames promise decades of maintenance-free performance. They’re lightweight yet strong, won’t rust or rot, and come in various colors. However, aluminum conducts heat and cold, potentially creating condensation issues.
PVC lean to greenhouse frames provide the most budget-friendly option. These lightweight structures resist moisture and insects but may become brittle in extreme cold or intense UV exposure without proper treatment.
Polycarbonate lean to greenhouse plans have revolutionized home greenhouse construction. These panels offer excellent insulation, won’t shatter like glass, and block harmful UV rays while transmitting up to 90% of visible light.
Glass provides unmatched clarity and aesthetic appeal. It’s scratch-resistant and maintains transparency for decades. However, glass weighs significantly more, costs more to install, and provides minimal insulation unless you choose expensive double-pane options.
Consider your climate when choosing glazing materials. Polycarbonate’s superior insulation makes it ideal for cold regions, while glass might suit mild climates where clarity matters more than energy efficiency.
| Material | Cost/sq ft | Light Transmission | Insulation Value | Lifespan |
|---|---|---|---|---|
| 6mm Twin-wall Polycarbonate | $2-3 | 80-85% | R-1.5 | 15-20 years |
| 10mm Triple-wall Polycarbonate | $3-4 | 75-80% | R-2.0 | 20-25 years |
| Single Glass | $3-5 | 90-92% | R-0.9 | 25+ years |
| Double Glass | $6-10 | 85-87% | R-2.0 | 25+ years |
| Polyethylene Film | $0.50-1 | 85-88% | R-1.0 | 3-4 years |
Quality fasteners prevent leaks and structural failures. Use screws with neoprene washers specifically designed for greenhouse applications—they expand and contract with temperature changes while maintaining weathertight seals.
H-channel and U-channel connectors join polycarbonate panels professionally. These aluminum or plastic strips prevent water infiltration while allowing thermal expansion and contraction.
Don’t forget ventilation hardware. Automatic vent openers respond to temperature changes without electricity, ensuring your plants never overheat during unexpected warm spells.
Building your own lean-to greenhouse combines careful planning with systematic execution. This detailed guide walks you through each phase, ensuring professional results even for first-time builders.
Start by marking your greenhouse footprint with stakes and string. Clear all vegetation and debris, then excavate 4-6 inches of soil to create a level base.
Install a gravel base for drainage, especially important in areas with clay soil. Compact the gravel thoroughly using a tamper or roller to prevent settling that could stress your frame.
For permanent installations, consider a concrete perimeter foundation. This provides maximum stability and prevents wood frames from ground contact, significantly extending their lifespan.
Attach a ledger board to your existing wall using lag bolts into studs—never rely on siding alone for support. This horizontal board bears significant weight and must be perfectly level.
Construct the front wall frame flat on the ground, ensuring all corners are square. Use a framing square and diagonal measurements to verify accuracy before standing the wall.
Install rafters from the ledger board to the front wall, spacing them 16-24 inches apart. Lean to greenhouse drawing plans typically show this spacing, which balances strength with material efficiency.
Begin panel installation from the bottom, working upward to ensure proper water runoff. Overlap panels according to manufacturer specifications—typically one corrugation for corrugated panels.
Pre-drill pilot holes to prevent cracking, especially in cold weather. Position screws on ridges rather than valleys to minimize leak potential during heavy rain.
Install ridge caps and side flashings to seal all edges. These components might seem minor but prove critical for preventing water damage to your frame and plants.
Door placement affects both functionality and plant arrangement. End doors work well for narrow greenhouses, while side doors suit wider structures where you’ll want direct access to planting beds.
Inside of lean to greenhouse layouts benefit from thoughtful window placement. Operable windows on both ends create cross-ventilation, essential for temperature control and disease prevention.
Consider installing waist-height windows if you’re building against a patio or deck. This clever design maximizes growing space while providing easy access for planting and harvesting.
Natural ventilation starts with strategic vent placement. Install roof vents near the peak where hot air naturally accumulates, and add lower vents for cool air intake.
Calculate ventilation needs based on floor area—generally, vent area should equal 20-30% of floor space. A 6×8 greenhouse needs approximately 10-14 square feet of ventilation.
Automatic vent openers offer worry-free climate control. These wax-filled cylinders expand when heated, opening vents at preset temperatures without requiring electricity or daily monitoring.
Finding the right plans makes construction significantly easier. Whether you prefer detailed blueprints or basic sketches, these options cater to various skill levels and budgets.
This starter-friendly design uses 1-inch PVC pipes bent into hoops for the frame. The total material cost typically runs $200-300, making it perfect for budget-conscious gardeners.
Assembly requires no special tools—just a PVC cutter and drill. The entire structure can be completed in a weekend, with plastic sheeting providing temporary or seasonal coverage.
While not as durable as permanent structures, PVC greenhouses offer flexibility. You can easily modify, expand, or relocate them as your gardening needs evolve.
2×4 lumber creates sturdy, long-lasting frames suitable for any climate. These plans typically include detailed cut lists, helping you purchase exact amounts and minimize waste.
Basic woodworking skills suffice for most designs. If you can operate a circular saw and drill, you can build a professional-looking greenhouse following good plans.
Free plans from extension services often include regional modifications. These account for local snow loads, wind conditions, and optimal angles for your latitude.
Standard plans rarely fit unique situations perfectly. Measure your available space carefully, then adjust plan dimensions proportionally to maintain structural integrity.
Large lean to greenhouse plans can be scaled down by reducing bay spacing. Instead of 4-foot sections, use 3-foot spacing to fit tighter spots while maintaining the original design’s proportions.
Consider modular designs that allow future expansion. Starting with a 6×8 structure and planning for eventual 6×12 or 6×16 configurations saves reconstruction headaches later.
Free plans from university extensions and gardening websites provide basic designs perfect for simple structures. They typically include materials lists and general instructions but may lack detailed diagrams.
Paid plans often include step-by-step photos, cutting diagrams, and email support. The $20-50 investment can save hours of frustration and prevent costly mistakes.
Professional plans also address details like electrical rough-ins, automatic watering systems, and interior layouts. These comprehensive guides prove invaluable for feature-rich greenhouses.
Understanding true costs helps set realistic budgets and identify areas for potential savings. These figures reflect average prices but vary by region and material choices.
DIY construction typically costs $5-15 per square foot for materials. A 6×8 foot greenhouse requires $240-720 in materials, depending on your frame and glazing choices.
Professional installation adds $20-40 per square foot for labor. That same 6×8 structure costs $1,200-2,400 installed, though you’ll gain warranty coverage and experienced construction.
Consider hybrid approaches—hiring professionals for foundation and framing while completing glazing and finishing work yourself. This balances cost savings with structural reliability.
Basic Lean to Greenhouse Budget Breakdown (6×8 feet):
Total DIY Cost Range: $600-1,300
Source recycled materials from construction sites or renovation projects. Old windows, doors, and lumber can reduce costs by 50% or more while adding character.
Buy polycarbonate panels in bulk with other greenhouse builders. Many suppliers offer significant discounts for larger orders that individual builders can share.
Consider starting with polyethylene sheeting for your first season. This $50-100 investment lets you test your site and refine plans before committing to permanent glazing.
Quality greenhouses typically recoup costs within 3-5 years through reduced grocery bills. Growing $500-1,000 worth of produce annually makes economic sense for active gardeners.
Home value increases average 5-10% of greenhouse cost for well-built structures. A $2,000 greenhouse might add $100-200 to your property’s value while providing immediate enjoyment.
Energy savings from passive solar heating can offset winter heating bills. Some homeowners report $50-100 monthly savings when their attached greenhouse faces south and connects to living spaces.
Transform your basic structure into a high-performance growing environment with strategic upgrades. These enhancements improve functionality while extending your growing season.
Solar-powered vent openers require no wiring yet maintain optimal temperatures automatically. These units typically open at 68-75°F, preventing heat stress during unexpected warm spells.
Thermostatically controlled exhaust fans provide precise climate control for serious growers. Paired with intake shutters, they create consistent airflow that reduces disease and promotes vigorous growth.
Smart greenhouse controllers now offer smartphone monitoring and control. Track temperature, humidity, and soil moisture from anywhere while receiving alerts about potential problems.
Electric heaters with built-in thermostats offer convenient, safe heating for small spaces. Calculate 30-50 BTUs per square foot for adequate winter warmth in most climates.
Propane heaters cost less to operate but require proper ventilation to prevent carbon dioxide buildup. Always install carbon monoxide detectors when using any combustion-based heating.
Passive solar techniques like water barrels or black-painted concrete blocks absorb daytime heat and release it slowly overnight. This free heating method can raise nighttime temperatures by 5-10°F.
Maximize vertical space with tiered benching along the back wall. This arrangement places shade-tolerant plants below while sun-lovers occupy upper shelves.
Install fold-down work surfaces for potting and transplanting tasks. These space-savers keep your greenhouse organized without permanently reducing growing area.
Hanging baskets and wall-mounted planters utilize overhead space effectively. Consider installing greenhouse shelf ideas that complement your growing style and plant selections.
Multi-purpose designs blend gardening with living space. Install proper flooring like sealed concrete or tile that handles both moisture and foot traffic.
Climate control becomes critical when people regularly occupy the space. Mini-split heat pumps provide efficient heating and cooling while maintaining optimal humidity levels.
Furnishings must withstand high humidity without developing mold or mildew. Choose naturally resistant materials like teak, aluminum, or quality outdoor furniture rated for covered spaces.
Regular maintenance extends your greenhouse’s lifespan while ensuring optimal growing conditions. These simple tasks prevent minor issues from becoming major repairs.
Clean panels twice yearly—spring and fall—to maintain light transmission. Use mild dish soap and soft brushes to avoid scratching the UV-resistant coating.
Remove algae and mineral deposits with a vinegar solution. Mix one part white vinegar with nine parts water for an effective, plant-safe cleaning solution.
Never use abrasive cleaners or pressure washers on polycarbonate. These aggressive methods damage the protective coating, leading to yellowing and reduced panel life.
Inspect and reseal any gaps before cold weather arrives. Small air leaks dramatically increase heating costs and create damaging drafts for sensitive plants.
Bubble wrap provides inexpensive insulation for winter months. The air pockets create an effective barrier while still allowing light transmission for plant growth.
Install min-max thermometers to monitor temperature extremes. Understanding your greenhouse’s thermal performance helps optimize heating strategies and prevent plant losses.
Condensation Issues:
Pest Management:
Structural Maintenance:
Strategic plant selection maximizes your greenhouse’s productivity throughout the year. Understanding each plant’s requirements ensures gardening success.
Spring (March-May): Start warm-season seedlings like tomatoes, peppers, and cucumbers. Direct seed cool-season crops including lettuce, spinach, and radishes.
Summer (June-August): Focus on heat-loving plants while providing shade for cool-season crops. Succession plant lettuce every two weeks for continuous harvests.
Fall (September-November): Plant cold-hardy vegetables for winter harvest. Start perennial herbs and flowers for next year’s garden.
Winter (December-February): Grow cold-tolerant greens, herbs, and root vegetables. Use this time for winter greenhouse maintenance and planning.
Utilize vertical growing techniques for vining crops like cucumbers and pole beans. Train plants up strings or trellises to quadruple your growing area.
Interplant quick-maturing crops between slower-growing plants. Radishes and lettuce grow well between tomato plants before the tomatoes need full space.
Container gardening allows easy rearrangement as plants grow. Use DIY garden projects to create custom planters that fit your specific space.
Containers offer superior drainage and disease control. They’re ideal for plants requiring different soil types or those prone to spreading aggressively.
In-ground beds provide better temperature stability and moisture retention. Deep-rooted plants like tomatoes often perform better with unrestricted root growth.
Consider hybrid approaches—permanent beds for long-term crops with containers for seasonal additions. This flexibility optimizes space while simplifying crop rotation.
Personalize your greenhouse to reflect your gardening style and enhance its functionality. These creative approaches transform basic structures into inspiring garden retreats.
Balcony lean-tos maximize apartment gardening potential. These mini structures attach to railings or walls, creating perfect environments for herbs and compact vegetables.
Vertical installations against garage walls utilize narrow spaces effectively. Even 2-foot deep greenhouses provide ample room for succession planting and season extension.
Modular designs allow urban gardeners to start small and expand gradually. Begin with a 4×4 section and add matching modules as experience and enthusiasm grow.
Paint or stain wooden frames to complement your home’s exterior. This simple upgrade transforms utilitarian structures into attractive architectural features.
Add decorative brackets, finials, or gingerbread trim for Victorian charm. These details cost little but dramatically enhance your greenhouse’s visual appeal.
Install garden decoration ideas like vintage signs, wind chimes, or stained glass accents. Personal touches make your greenhouse a true extension of your home.
Breakfast nook greenhouses combine dining with garden views. Install a small bistro set where you can enjoy morning coffee surrounded by thriving plants.
Workshop combinations provide year-round project space. The controlled environment protects tools while offering comfortable working conditions regardless of weather.
Artist studios benefit from consistent natural light and inspiring surroundings. Many creative professionals find greenhouse environments boost productivity and imagination.
Learning from others’ experiences helps ensure your greenhouse project succeeds. These common pitfalls are easily avoided with proper planning.
Inadequate Ventilation Planning: Many builders underestimate ventilation needs, leading to overheating and disease problems. Calculate required vent area early and install more than you think necessary.
Wrong Material Choices for Climate: Selecting materials based solely on price often leads to premature failure. Research your specific climate challenges and choose accordingly.
Poor Foundation Preparation: Rushing foundation work causes long-term structural problems. Invest time in proper site preparation for decades of trouble-free use.
Ignoring Local Building Codes: Assuming small structures don’t need permits leads to costly corrections. Always verify requirements before starting construction.
Underestimating Heating Needs: Cold climate gardeners often discover their heating plans inadequate during the first harsh winter. Calculate heat loss carefully and size systems appropriately.
Not all walls suit greenhouse attachment. Load-bearing walls with proper foundations support additional weight best. Avoid attaching to walls with vinyl siding without first installing proper backing.
Basic DIY structures start around $600 for a 6×8 foot greenhouse using economical materials. Professional installation of the same size typically runs $1,500-2,500 depending on features and location.
Without supplemental heat, nighttime temperatures inside approach outdoor levels. However, daytime solar gain can raise temperatures 20-30°F above outside conditions on sunny days.
A 6×8 foot greenhouse provides manageable space for learning while offering room for diverse plants. This size costs less to heat and maintain while providing valuable growing experience.
Most handy homeowners successfully complete lean-to greenhouse projects. Basic carpentry skills, patience, and good plans lead to professional-looking results without contractor assistance.
Building a lean to greenhouse opens endless possibilities for year-round gardening success. From fresh winter salads to early spring seedlings, your attached greenhouse becomes a productive extension of both home and garden.
The journey from planning through construction might seem daunting, but thousands of gardeners prove it’s achievable. By following proven plans and learning from others’ experiences, you’ll create a structure that provides decades of gardening enjoyment.
Start sketching your ideas today. Visit local greenhouse gardening groups or online forums like GardenWeb where experienced growers share advice freely. Your perfect lean-to greenhouse awaits—sometimes the hardest part is simply beginning.
Remember, even experienced builders started with their first project. Take that first step toward creating your own sustainable growing space, and soon you’ll wonder how you ever gardened without it.