
If you’ve ever found yourself standing in your garage, staring at a weed wacker with an empty spool, you’re not alone. I’ve been there countless times, and after years of trial and error (and a few tangled messes), I’ve perfected the process of restringing these essential lawn tools. Whether you call it a weed wacker, weed eater, or string trimmer, keeping it properly strung is crucial for maintaining your lawn efficiently.
Learning to string your weed wacker properly not only saves you money on professional maintenance but also ensures your lawn care routine stays on track. In this comprehensive guide, I’ll walk you through everything from basic stringing techniques to troubleshooting common problems, plus I’ll share some eco-friendly alternatives that can make your lawn maintenance more sustainable.
We’ll cover different trimmer head types, the tools you’ll need, and step-by-step instructions that work for most models. I’ve also included tips on choosing biodegradable trimmer line options that perform just as well as traditional plastic lines while being gentler on the environment.
Before we dive into the stringing process, it’s essential to identify what type of trimmer head you’re working with. Over the years, I’ve worked with dozens of different models, and they generally fall into three main categories.
Bump-Feed Heads: These are the most common type you’ll encounter. They release more line when you bump the bottom of the trimmer head against the ground while it’s running. I find these particularly convenient for residential use because you can control exactly when to release more line.
Auto-Feed Heads: These automatically release line as it wears down, using centrifugal force to detect when more line is needed. While they’re convenient, they can sometimes go through line faster than necessary if not properly calibrated.
Fixed-Line Heads: These use pre-cut pieces of line that you manually insert through the head. They’re simple and reliable but require you to stop and reload more frequently. They’re excellent for heavy-duty work where you need consistent cutting power.
Getting organized before you start makes the whole process smoother. Here’s what I always have ready when it’s time to restring:
When selecting trimmer line, consider the type of vegetation you’ll be cutting. Thinner line (0.065″ to 0.080″) works well for grass and light weeds, while thicker line (0.085″ to 0.095″) handles tougher weeds and brush. If you’re interested in sustainable options, biodegradable trimmer lines made from plant-based materials are now available and perform comparably to traditional nylon lines.
Now let’s get into the actual process. I’ll walk you through the method that works for most bump-feed and auto-feed models, which account for about 80% of residential trimmers.
Always start by ensuring your trimmer is completely powered down. For gas models, remove the spark plug wire. For electric models, unplug the cord or remove the battery. This might seem obvious, but I’ve seen too many close calls from people trying to work on equipment that could accidentally start.
Most trimmer heads have a spool housing that needs to be removed to access the line spool. Look for tabs on the sides of the head – these usually need to be pressed simultaneously while turning the spool cap counterclockwise. Some models have a simple twist-off cap. Once removed, carefully lift out the inner spool, keeping track of any springs or washers that might come with it.
This is a step many people skip, but I’ve found it makes a huge difference. Use a small brush or compressed air to remove grass clippings and debris from both the spool and housing. Built-up debris can prevent the line from feeding properly and cause premature wear on your trimmer head.
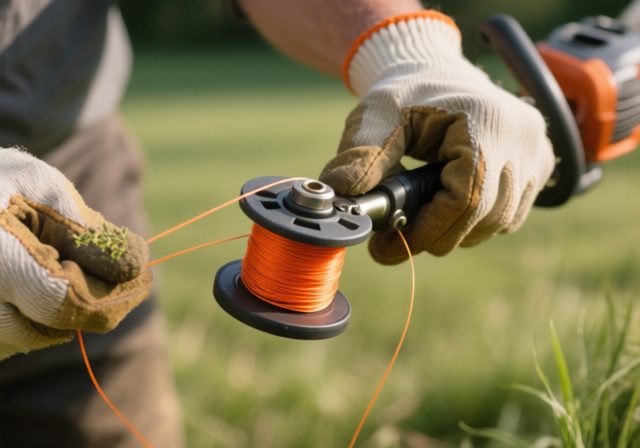
Cut approximately 15-25 feet of new line, depending on your spool size. Most residential trimmers use between 15-20 feet. Look for an arrow on the spool indicating the winding direction – this is crucial for proper line feeding. If there’s no arrow, the line typically winds in the same direction the head spins during operation.
Find the starter hole or slot in the center of the spool. Insert about 1/2 inch of line into this anchor point. Some spools have a small hole where you thread the line through, while others have a slot where you simply wedge it in place. Make sure it’s secure before you start winding.
Here’s where patience pays off. Wind the line evenly and tightly in the direction indicated, keeping each wrap parallel to the previous one. Don’t let the line overlap or cross over itself – this causes feeding problems later. Leave about 6 inches of line unwound at the end.
For dual-line spools, you’ll repeat this process on the second channel, or if your spool has a divider, wind half the line on each side. The key is maintaining even tension and neat, parallel wraps.
Feed the loose ends of the line through the eyelets (exit holes) in the spool housing. These guide the line out of the head during operation. Make sure the line moves freely through these holes without binding.
Carefully place the spool back into the housing, ensuring any springs or washers are in their proper positions. The line should feed through the housing’s exit ports. Snap or twist the cap back on, making sure it’s securely fastened. Give the line a gentle tug to ensure it feeds properly.
Even with careful attention, problems can arise. Here are solutions to the most common issues I encounter:
Line Won’t Feed: This usually happens when the line is wound too loosely or in the wrong direction. Remove the spool and rewind it, ensuring proper tension and direction. Also check that the line isn’t too thick for your trimmer’s specifications.
Line Breaks Frequently: If your line keeps breaking, you might be using line that’s too thin for your cutting needs, or the line might be old and brittle. Store your trimmer line in a cool, dry place to prevent degradation. I’ve also found that soaking older line in warm water for 24 hours can restore some flexibility.
Line Feeds Too Quickly: This typically indicates the line is wound too loosely or the spring mechanism in auto-feed heads needs adjustment. Check your manual for spring tension specifications.
Tangled Line: Tangles usually result from overlapping winds or using line that’s too long for your spool. Always follow the manufacturer’s recommended line length and maintain parallel winds.
As someone who cares about sustainable lawn care, I’ve tested several eco-friendly trimmer line options over the past few years. Traditional nylon trimmer line doesn’t biodegrade and contributes to microplastic pollution when it breaks down. Fortunately, there are now viable alternatives.
Biodegradable trimmer lines made from plant-based polymers offer similar cutting performance to traditional lines while breaking down naturally over time. These lines are typically made from materials like corn starch polymers or other plant-based resins. While they cost slightly more upfront, the environmental benefits make them worthwhile for conscious homeowners practicing green cleaning habits in all aspects of home maintenance.
I’ve found that biodegradable lines work best in moderate conditions – they may not hold up as well against heavy brush or in extremely hot conditions, but for regular grass trimming and light weed control, they perform admirably. The peace of mind knowing you’re not contributing to plastic pollution makes the slight performance trade-off acceptable for most residential applications.
Some manufacturers now offer trimmer lines made from recycled materials, which, while not biodegradable, help reduce waste by giving used plastics a second life. These tend to be more durable than biodegradable options while still being more environmentally responsible than virgin plastic lines.
Proper maintenance extends the life of your trimmer line and reduces the frequency of restringing. Here are practices I’ve developed over years of lawn care:
Store Properly: Keep unused trimmer line in a sealed container away from direct sunlight. UV rays degrade nylon and make it brittle. I store mine in an old coffee can in my garage.
Soak Before Use: If your line has been stored for several months, soak it in warm water overnight before stringing. This restores flexibility and reduces breakage during use.
Avoid Hard Surfaces: While trimming, try to avoid contact with concrete, rocks, and metal surfaces. These wear down line quickly and can cause premature breaking. When edging along driveways, maintain a consistent distance to minimize contact.
Use the Right Technique: Let the tip of the line do the cutting rather than forcing the entire length against vegetation. This reduces stress on the line and provides cleaner cuts. The proper cutting zone is typically the last 2-3 inches of extended line.
Regular Cleaning: After each use, clean grass clippings and debris from the trimmer head. This prevents buildup that can interfere with line feeding and cause overheating.
Fixed-line heads require a slightly different approach. Instead of winding line onto a spool, you’ll use pre-cut pieces that insert directly through the head.
Start by cutting line pieces to the specified length – usually between 6 and 12 inches. Thread each piece through the head’s channels until equal lengths protrude from both sides. Some models have a locking mechanism that holds the line in place, while others rely on the centrifugal force during operation.
Fixed-line heads are excellent for heavy-duty work and areas with lots of obstacles. Since you’re only replacing small pieces at a time, there’s less waste, and you can quickly swap in fresh line without removing the entire head. This makes them particularly efficient for professional landscapers or homeowners with large properties.
Following a seasonal maintenance schedule keeps your weed wacker in top condition and reduces unexpected failures. Here’s the routine I follow:
Spring (March-April): Perform a complete inspection and restring with fresh line. Check the trimmer head for cracks or damage from winter storage. This is also a good time to consider your lawn and garden ideas for the upcoming season.
Early Summer (June): Mid-season line replacement if you trim frequently. Clean the air filter on gas models and check the power cord on electric models for any damage.
Late Summer (August): Inspect the trimmer head for wear and replace if necessary. This heavy-use period often reveals any developing problems.
Fall (October): Final restringing before winter storage. Clean thoroughly and apply a light coat of oil to metal parts to prevent rust. Remove old line from the spool to prevent it from taking a set over winter.
After talking with professional landscapers and grounds maintenance crews, I’ve picked up several insider tips that make stringing easier and more efficient:
Mark your ideal line length on your workbench with tape. This saves time measuring for each restringing and ensures consistency.
Keep a small container of water nearby when stringing. Dipping your fingers occasionally prevents the line from sticking to dry hands and makes handling easier.
For dual-line spools, use different colored lines on each side. This makes it immediately obvious if one side isn’t feeding properly.
Write the date on your spool with a permanent marker each time you restring. This helps track line consumption and identify when you might need trimmer head maintenance.
Consider keeping a pre-wound spare spool if your trimmer model allows it. This lets you quickly swap spools in the field without stopping to restring.
Beyond choosing eco-friendly trimmer line, there are other ways to make your weed wacking more environmentally responsible. These practices align with sustainable lawn landscaping ideas that benefit both your property and the environment.
Time your trimming to avoid disturbing wildlife. Early morning and evening are when many beneficial insects are most active. Mid-morning or late afternoon trimming minimizes disruption to pollinators and other helpful garden creatures.
Create natural borders using sustainable outdoor furniture or landscaping features to reduce the amount of trimming needed. This not only saves time and reduces emissions from gas trimmers but also creates defined spaces that require less maintenance.
Consider leaving some areas untrimmed to provide habitat for beneficial insects and small wildlife. A slightly wild edge along fence lines or around trees can support biodiversity while still maintaining an overall neat appearance.
Collect trimmed vegetation for composting rather than leaving it to decompose on walkways. This returns nutrients to your soil and reduces the need for synthetic fertilizers.
Q: How often should I replace my trimmer line?
A: It depends on use frequency and the type of vegetation you’re cutting. For average residential use (weekly trimming during growing season), expect to restring every 4-6 weeks. Heavy use or tough weeds may require weekly restringing.
Q: Can I use any diameter line in my trimmer?
A: No, always use the diameter specified in your owner’s manual. Using line that’s too thick can damage the motor, while line that’s too thin breaks frequently and provides poor cutting performance.
Q: Why does my line keep welding together?
A: This happens when the line overheats, usually from running the trimmer at less than full throttle or forcing it through heavy vegetation. Always run at full speed and let the line tip do the cutting.
Q: Is square or round line better?
A: Square and star-shaped lines cut more aggressively and work well for tough weeds, but they break more easily. Round line is more durable and better for general grass trimming. Choose based on your primary use.
Q: Can I leave line on the spool over winter?
A: It’s better to remove it. Extended time wound on the spool can cause the line to take a permanent curved shape, leading to feeding problems in spring.
Q: How do I know when to replace the entire trimmer head?
A: Replace the head if you notice cracks, excessive wear on the eyelets, or if the bump-feed mechanism stops working properly. Most heads last 2-3 years with regular residential use.
Q: Is biodegradable line really as good as regular line?
A: For most residential applications, yes. It may wear slightly faster in extreme conditions, but the environmental benefits outweigh the minimal performance difference for typical lawn maintenance.
Q: What’s the best way to edge along driveways?
A: Turn the trimmer vertical and use just the tip of the line. Walk slowly and maintain consistent distance from the concrete. This technique minimizes line wear and creates clean edges.
Mastering the art of stringing your weed wacker is a valuable skill that saves money and keeps your lawn looking its best. With the techniques I’ve shared, you should be able to confidently restring any trimmer type you encounter. Remember that practice makes perfect – your first few attempts might take longer, but you’ll quickly develop a rhythm.
The shift toward eco-friendly trimmer lines and sustainable lawn care practices shows that we can maintain beautiful outdoor spaces while being mindful of our environmental impact. Whether you choose biodegradable line or simply adopt better maintenance practices, every small step contributes to a healthier planet.
Regular maintenance, proper stringing technique, and choosing the right line for your needs will keep your weed wacker running efficiently for years. And if you’re planning broader improvements to your outdoor space, consider incorporating non-toxic wood sealers for any garden bed projects to maintain that eco-friendly approach throughout your property.
Take your time with the stringing process, follow the steps carefully, and don’t hesitate to refer back to this guide whenever you need a refresher. Your well-maintained weed wacker will reward you with years of reliable service and a beautifully manicured lawn that you can be proud of.
Don't let aphids, slugs, and caterpillars ruin another plant. Take back control with simple, natural methods that actually work.
