
When your car’s AC compressor fails or contaminants build up in the system, knowing how to flush AC system properly can save you thousands in repair costs and restore your cooling efficiency. This comprehensive guide provides detailed car air conditioner flush instructions that will help you clean your automotive air conditioning system like a professional.
An AC flush removes metal shavings, debris, old refrigerant oil, and contaminants that accumulate when components fail or the system is opened. Without proper flushing, these particles recirculate through your system, potentially destroying your new compressor within days. This guide covers everything from the tools you’ll need to safety precautions and step-by-step instructions for performing a complete air conditioner coolant flush.
Your automotive air conditioner flushing process serves several crucial purposes that directly impact system performance and longevity. When contaminants like metal particles, moisture, or degraded oil circulate through the system, they act like sandpaper on internal components.
The AC compressor, your system’s most expensive component, is particularly vulnerable to contamination damage. Even microscopic metal shavings can score precision surfaces, leading to premature failure. A proper flush removes these harmful particles before they cause catastrophic damage.
According to automotive experts, failing to flush the system when replacing major components is the leading cause of repeat compressor failures. This oversight can turn a $500 repair into a $2,000 replacement within weeks.
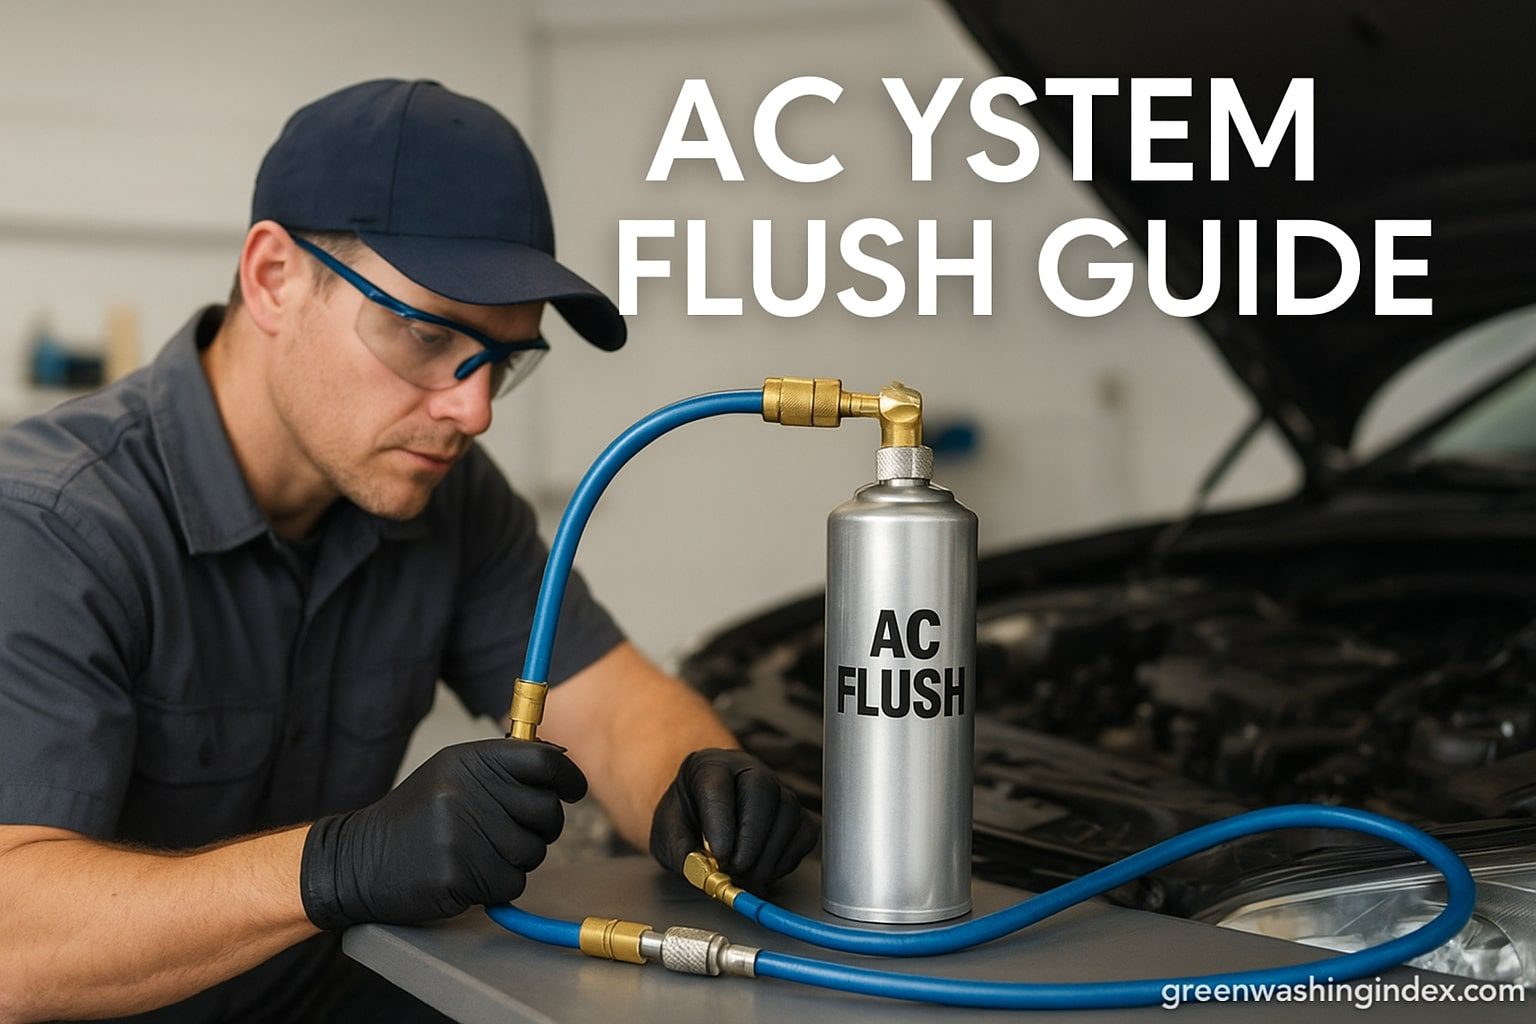
Before learning how to flush air conditioner systems, you need the right equipment. The proper tools make the difference between a professional-quality flush and potential system damage.
Many auto parts stores offer AC flush tools through loan programs, making professional-grade equipment accessible for DIY repairs. AutoZone air conditioner flush instructions specifically recommend their loaner tool #57377 for optimal results.
Working with AC systems involves handling pressurized equipment and chemical solvents. Following proper safety protocols prevents injury and ensures successful results.
Always wear safety goggles and chemical-resistant gloves throughout the flushing process. AC flush solvents can cause skin irritation and eye damage on contact. Long sleeves and closed-toe shoes provide additional protection against chemical splashes.
Perform all flushing operations in well-ventilated areas to avoid inhaling solvent fumes. Open garage doors or work outdoors when possible. Never flush near open flames or ignition sources, as most flush solvents are flammable.
Ensure the AC system is completely evacuated before beginning. Any remaining refrigerant must be recovered by certified equipment to comply with environmental regulations. Never attempt to flush a pressurized system.
Begin by disconnecting the AC system at key points. Remove the compressor, accumulator/drier, and expansion valve, as these components should never be flushed. They must be replaced rather than cleaned when contaminated.
Disconnect hoses at the firewall for evaporator access. Remove condenser inlet and outlet connections. Label each connection point to ensure proper reassembly later.
Examine all removed components for visible contamination. Metal shavings, black residue, or unusual debris indicate severe system contamination requiring thorough flushing.
Pour a small amount of flush solvent through each component and catch the runoff. Contaminated flush appears dark or contains visible particles. Clean flush indicates minimal contamination.
Evaporator Core Flushing The evaporator requires careful flushing due to its location and delicate construction. Connect your flush gun to the evaporator inlet. Use moderate pressure (60-80 PSI) to avoid damage.
Flush in the opposite direction of normal refrigerant flow for best results. Continue until the solution runs clear. Multiple passes ensure complete contamination removal.
Condenser Flushing The condenser’s parallel tubes trap debris effectively, requiring thorough cleaning. Flush from bottom to top, against normal flow direction. This technique dislodges accumulated particles more effectively.
Use higher pressure (80-100 PSI) for condensers due to their robust construction. Shake the condenser between flushes to help dislodge trapped contaminants.
Line Flushing AC lines collect significant contamination, especially at bends and low points. Flush each line separately, using full pressure (100-120 PSI) for straight sections.
Pay special attention to liquid lines from the condenser, as these often contain the most debris. Continue flushing until you achieve consistently clean output.
After flushing, blow clean, dry compressed air through all components for 10-15 minutes. This removes residual flush solvent and moisture. Any remaining solvent can damage the new compressor or react with refrigerant oil.
Allow components to air dry for an additional 30 minutes before reassembly. This ensures complete solvent evaporation and prevents system contamination.
Selecting appropriate flush chemicals significantly impacts cleaning effectiveness and system safety. Professional-grade solvents provide superior cleaning while remaining safe for system components.
Modern AC flush solvents use specialized formulations that dissolve old oil and suspend contaminants without leaving residue. These products evaporate completely during the drying process, preventing system contamination.
Quality flush solvents cost $20-30 per quart, with most systems requiring 1-2 gallons for thorough cleaning. This investment protects your new components and ensures long-term reliability.
Some technicians use denatured alcohol as an economical alternative, especially for heavily contaminated systems. While effective for initial cleaning, alcohol can leave residue requiring additional flushing with commercial products.
Never use brake cleaner, acetone, or other harsh solvents. These chemicals damage rubber seals and leave harmful residues that react with refrigerant oil.
Proper reassembly ensures your freshly cleaned system operates efficiently. Install new O-rings at every connection point, as old seals may leak after solvent exposure.
After assembly, vacuum the system for 45-60 minutes to remove air and moisture. The system should maintain 29 inches of mercury vacuum when the pump stops. Any vacuum loss indicates leaks requiring immediate attention.
Understanding what not to do is just as important as knowing the correct procedures. These common errors can damage your AC system or result in poor cooling performance.
Never flush unnecessarily. If your system cools properly and has no contamination signs, flushing provides no benefit and risks introducing problems.
Using too little flush solvent or rushing the process leaves contaminants behind. Plan to use at least one gallon of flush solution for thorough cleaning. Continue flushing until the output remains consistently clean.
Never reuse the accumulator/drier or expansion valve after system contamination. These components trap debris and cannot be effectively cleaned. Their low cost makes replacement the only sensible option.
Responsible AC system maintenance includes proper disposal of contaminated flush solvents. Never pour used flush solution down drains or onto the ground. The chemicals and captured contaminants require hazardous waste disposal.
Many communities offer eco-friendly disposal options for automotive chemicals. Contact your local waste management facility for proper disposal locations and procedures.
Using environmentally conscious cleaning methods extends beyond household products to automotive maintenance. Choose flush solvents with lower environmental impact when possible.
While DIY flushing saves money, certain situations warrant professional service. Complex contamination, repeated compressor failures, or uncertainty about procedures justify professional intervention.
Professional shops use specialized flush machines that circulate solvent continuously while monitoring contamination levels. This equipment provides superior cleaning compared to manual methods.
However, careful DIY flushing following proper procedures achieves excellent results for most situations. The key lies in patience, proper tools, and attention to detail.
Regular maintenance prevents the contamination that necessitates system flushing. These preventive measures extend component life and maintain cooling efficiency.
Have your AC system inspected annually, checking for leaks, proper refrigerant levels, and component condition. Early problem detection prevents contamination spread and costly repairs.
Replace cabin air filters according to manufacturer recommendations. Clean filters reduce system strain and prevent debris infiltration. Choosing sustainable maintenance products extends environmental benefits beyond your vehicle.
Address AC problems immediately. Running a damaged system spreads contamination throughout, turning minor repairs into major overhauls. Strange noises, reduced cooling, or visible leaks demand immediate attention.
Understanding the economics helps you make informed decisions about AC system maintenance. DIY flushing typically costs $150-200 including flush solvent and tool rental.
Professional flushing services range from $300-500, depending on system complexity and contamination levels. This includes labor, materials, and often a service warranty.
The DIY savings become significant when combined with component replacement. However, factor in your time value and mechanical confidence when deciding.
Only flush when replacing major components or addressing contamination. Routine flushing is unnecessary and potentially harmful. Most systems never require flushing if properly maintained.
Effective flushing requires component removal for proper access and flow direction. In-place flushing provides inadequate cleaning and risks pushing contaminants into sensitive areas.
Debris from the failed compressor circulates through your new components, causing premature failure. This oversight commonly results in multiple compressor replacements within months.
Flushing procedures remain similar for R134a and R1234yf systems. However, use only flush solvents approved for your specific refrigerant type to prevent chemical reactions.
Successful flushing produces clear, clean output from all components. Your recharged system should cool efficiently with proper pressure readings and no unusual noises.
Learning how to flush AC system components properly protects your investment in new parts while restoring cooling performance. This essential maintenance procedure removes harmful contaminants that otherwise destroy expensive components and compromise comfort.
Whether you choose DIY flushing or professional service, never skip this critical step when replacing major AC components. The time and money invested in proper flushing pay dividends through reliable cooling and extended component life.
Don't let aphids, slugs, and caterpillars ruin another plant. Take back control with simple, natural methods that actually work.
