

A leaking garden hose wastes more than just water—it’s literally money dripping away from your household budget. According to the EPA, a single leak can waste up to 180 gallons per week, which adds up to 9,360 gallons annually. That’s enough water to take 200 showers!
I’ve repaired dozens of garden hoses over the years, and I can tell you that fixing a leak takes just 10-15 minutes and costs under $5 in most cases. Compare that to buying a new $30-50 hose every time you encounter a problem, and the environmental and financial benefits become crystal clear.
This guide walks you through every type of garden hose leak you might encounter, from simple connector issues to more complex mid-hose punctures. We’ll also explore how these simple repairs contribute to water conservation tips that can significantly reduce your environmental footprint.
Before grabbing your tools, it’s important to understand why garden hoses develop leaks in the first place. Identifying the cause helps you choose the right repair method and prevent future issues.
The most common leak location is where your hose connects to the spigot or attachments. These areas experience constant stress from water pressure, twisting motions, and temperature changes. The rubber washers inside these connections deteriorate over time, especially when exposed to hot water or left connected during freezing temperatures.
I’ve noticed that hoses stored improperly—left kinked or coiled too tightly—develop connection leaks much faster. The constant pressure on these joints weakens the seal, leading to those annoying drips that turn into steady streams if left unaddressed.
Mid-hose leaks typically result from physical damage. Running over the hose with a lawnmower, dragging it across rough surfaces, or exposure to sharp objects creates punctures and tears. Sun damage also plays a significant role—UV rays break down the hose material, making it brittle and prone to cracking.
Temperature extremes cause expansion and contraction that stress the hose material. Hoses left outside during winter often develop multiple small cracks along their length, especially if water freezes inside them.
Having the right tools makes hose repair straightforward and ensures a lasting fix. Most of these items are standard essential gardening tools you probably already own.
Each type of leak requires a specific repair approach. Follow these detailed instructions based on where your hose is leaking.
Step 1: Turn off the water and disconnect the hose. Allow any remaining water to drain completely. This prevents water spray during repair and lets you work comfortably.
Step 2: Inspect the rubber washer inside the female coupling. Look for cracks, tears, or compression damage. Even if the washer looks okay, replace it if it’s been in use for more than two seasons—preventive replacement costs pennies and saves gallons of water.
Step 3: Remove the old washer using a small flathead screwdriver. Be careful not to scratch the brass fitting, as this can create an uneven surface that prevents proper sealing.
Step 4: Insert the new washer. Ensure it sits flat and level within the coupling. A tilted washer won’t create an effective seal and will fail quickly under pressure.
Step 5: Reconnect to the spigot. Hand-tighten first, then give an additional quarter turn with pliers. Over-tightening damages the washer and actually causes leaks.
Mid-hose damage requires cutting out the damaged section and installing a mender. This permanent fix takes about 10 minutes and restores full water flow.
Step 1: Locate and mark the damaged area. Add an inch on each side of visible damage to ensure you remove all compromised material.
Step 2: Cut out the damaged section. Use a sharp utility knife to make clean, perpendicular cuts. Angled cuts prevent proper sealing and cause future leaks.
Step 3: Select the appropriate hose mender. Match the mender size to your hose diameter (typically 5/8″ or 3/4″). Using the wrong size creates immediate leaks or restricts water flow.
Step 4: Insert the mender barbs into each hose end. Push firmly and twist slightly to seat the barbs fully. You should feel resistance as the barbs grip the inner hose wall.
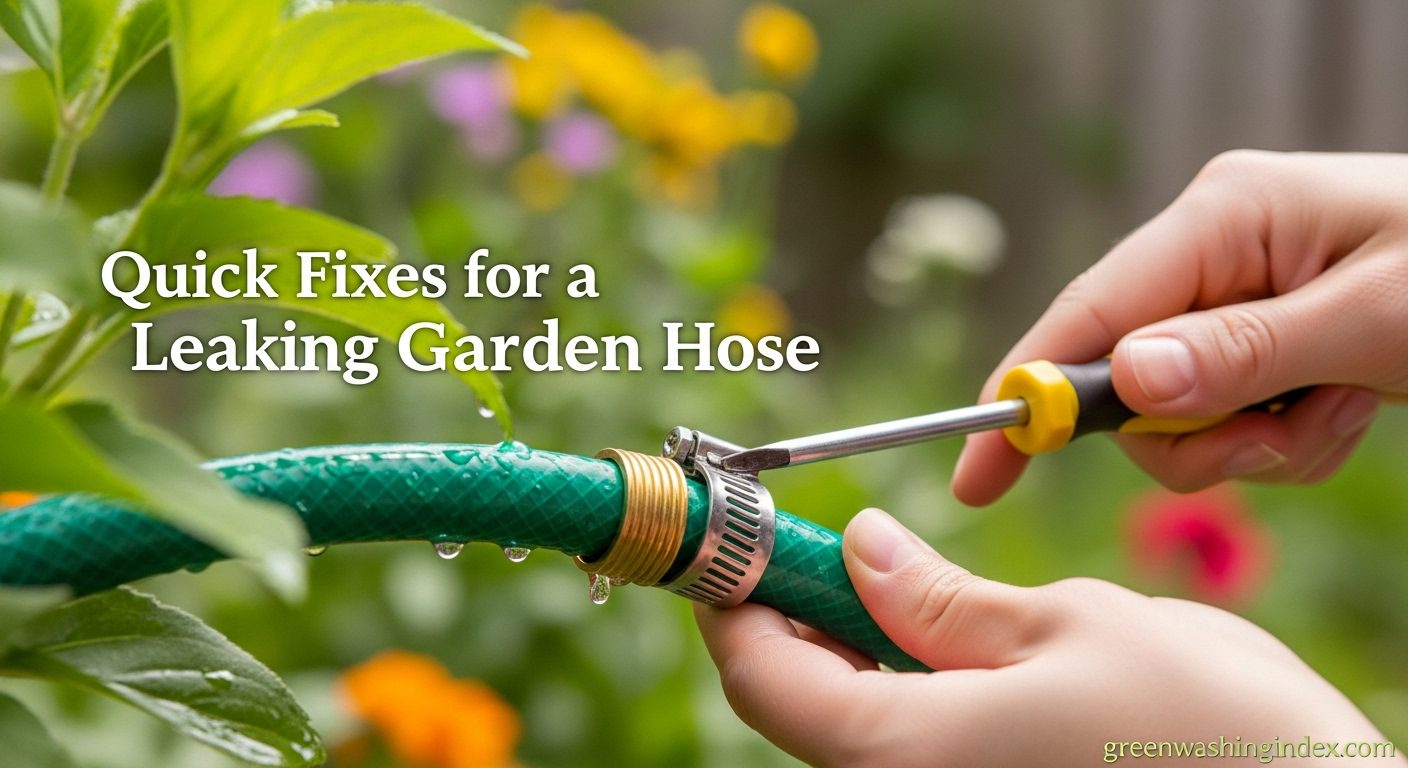
Step 5: Secure with hose clamps. Position clamps over the barbed sections and tighten until snug. The hose should compress slightly but not deform.
Step 6: Test the repair. Turn on water gradually and check for leaks. If you see drips, tighten the clamps incrementally until the leak stops.
When the metal or plastic coupling at either end of your hose cracks or strips, replacement provides the only permanent solution.
Step 1: Cut off the damaged fitting. Remove about 2 inches of hose along with the old coupling to ensure you’re working with undamaged material.
Step 2: Choose a replacement coupling. Select male or female as needed, ensuring it matches your hose diameter. Brass fittings cost more but last significantly longer than plastic.
Step 3: Insert the barbed end into the hose. Some resistance is normal—if it slides in too easily, the coupling is too small. Apply a small amount of dish soap to ease insertion if needed.
Step 4: Secure with a hose clamp. Position the clamp directly over the barbed section and tighten firmly. A properly installed coupling should withstand pulling without movement.
Repairing your garden hose instead of replacing it delivers significant environmental benefits beyond the obvious water savings. Manufacturing a new 50-foot garden hose requires approximately 2 pounds of PVC or rubber, plus the energy for production and transportation.
A single pinhole leak wastes about 170 gallons per month—enough water to sustain a 10×10 vegetable garden for two weeks during summer. Multiply this by millions of households with leaking hoses, and we’re talking about billions of gallons of wasted water annually.
The financial impact is equally compelling. At average water rates of $4 per 1,000 gallons, a small leak costs you about $8 per year. But during summer watering restrictions, when rates can double or triple, that same leak might cost $20-25 annually. Compare this to a $3 repair that takes 10 minutes, and the choice becomes obvious.
Consider integrating your repaired hose into DIY self-watering systems that maximize efficiency. These systems work best with leak-free hoses, as even small drips can oversaturate specific areas while leaving others dry.
Prevention beats repair every time. These maintenance practices can triple your hose lifespan while preventing most common leaks.
Spring: Inspect your hose thoroughly after winter storage. Run water through it at low pressure first, checking all connections and the entire length for winter damage. Replace washers preemptively—they’re cheap insurance against mid-season failures.
Summer: Store your hose in shade when not in use. UV radiation degrades hose materials faster than any other factor. If shade storage isn’t possible, consider a hose reel with a cover or a deck box designed for hose storage.
Fall: Drain hoses completely before storage. Water left inside expands when frozen, creating cracks and weakening joints. Disconnect from spigots and store indoors if possible—a garage or shed works perfectly.
Winter: Never leave hoses connected to outdoor spigots during freezing weather. Even frost-proof spigots can freeze if a hose traps water in the valve. Store hoses in loose coils to prevent kinking and stress cracks.
How you store your hose matters as much as how you use it. Avoid tight coils that stress the material and create weak points. Instead, use figure-8 loops or a hose reel that maintains the hose’s natural curve.
Keep hoses off concrete when possible. Concrete absorbs and radiates heat, accelerating material degradation. A simple wooden rack or wall-mounted holder extends hose life significantly.
While repair is usually the best environmental and economic choice, some situations call for replacement. Multiple leaks along the hose length indicate material failure—repair becomes a temporary fix at best. If you’re making more than three repairs on a single hose, replacement makes sense.
Hoses with damaged inner linings shed particles that clog sprinklers and damage pump systems. You’ll notice reduced water flow even after clearing visible blockages. This internal damage can’t be repaired and requires replacement.
Consider the hose age too. A quality hose lasts 5-10 years with proper care. If yours is approaching this age and developing issues, investing in a new, high-quality hose prevents the frustration of repeated repairs.
Even hoses beyond repair serve useful purposes in the garden. Cut them into sections for plant ties that won’t damage delicate stems. Thread rope through old hose pieces to create cushioned handles for buckets or garden tools.
Split a hose lengthwise to create edge protectors for raised beds or to cushion wire fencing. Short sections work as sleeves to protect young tree trunks from string trimmer damage. These creative garden watering ideas extend the useful life of materials that would otherwise end up in landfills.
Fixing a leaking garden hose represents more than a simple repair—it’s a commitment to resource conservation and environmental responsibility. Every leak you fix prevents thousands of gallons of water waste annually while keeping functional equipment out of landfills.
The techniques I’ve shared come from years of maintaining garden hoses in various conditions. Whether you’re dealing with a simple washer replacement or a more complex mid-hose repair, these methods provide lasting solutions that save money and protect our water resources.
Remember, the best time to fix a leak is as soon as you notice it. Small leaks quickly become big problems, and water wasted today can’t be recovered tomorrow. Take 15 minutes this weekend to inspect and repair your garden hoses—your wallet and the environment will thank you.