
Ceiling Fan Cleaning: The process of removing dust, dirt, and grease buildup from fan blades, motor housing, and light fixtures to improve efficiency by up to 30% and prevent dust circulation.
That ceiling fan spinning above your head? It’s probably circulating more than just air. I’ve seen fans with quarter-inch dust cakes on their blades, silently sprinkling allergens throughout homes every time they’re switched on. After cleaning hundreds of ceiling fans in my home maintenance business, I can tell you that a dirty fan isn’t just unsightly—it’s actively working against you.
Learning how to clean ceiling fans properly isn’t just about aesthetics. It’s about improving your home’s air quality, reducing allergy symptoms, and maintaining your fan’s efficiency. When dust builds up on fan blades, it can reduce airflow by up to 30% and make your fan work harder, costing you more in energy bills. A clean fan moves air more efficiently, helping with home airflow improvement throughout your space.
This comprehensive guide will walk you through everything you need to know about ceiling fan maintenance. I’ll share the pillowcase method that’s gone viral for preventing dust storms, show you how to clean without climbing a ladder, and reveal the professional techniques that will keep your fans running like new for years.
Before you begin cleaning, gather these supplies. Having everything ready will make the process smoother and more efficient.
Quick Summary: You’ll need basic cleaning supplies most homeowners have, plus a few specialized tools for hard-to-reach fans. The pillowcase method requires nothing more than an old pillowcase!
Safety should always be your top priority when cleaning ceiling fans. I’ve seen too many accidents happen from skipping these crucial steps.
⚠️ Important: Always turn off the power at the circuit breaker for maximum safety, not just using the wall switch.
This method provides the deepest clean and works for all types of ceiling fans. Plan for about 30-45 minutes per fan.
Quick Summary: The complete cleaning process involves prep work, dust removal, detailed cleaning, drying, and final checks. Take your time with each step for the best results.
✅ Pro Tip: For greasy kitchen fans, add a drop of dish soap to your cleaning solution. The degreasing properties will cut through cooking residue much better than standard cleaners.
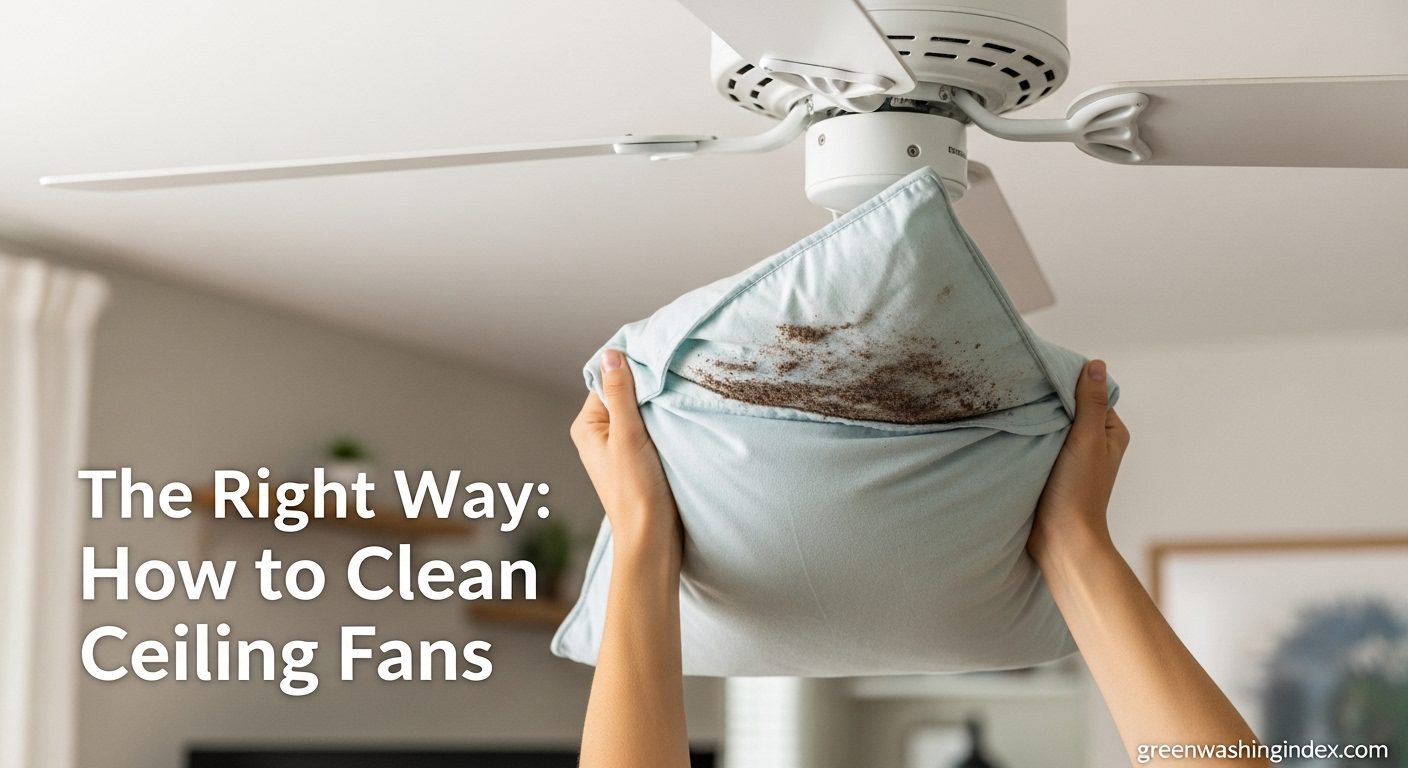
This viral cleaning method has taken the internet by storm for good reason—it works! I’ve taught this technique to dozens of clients who previously hated cleaning their fans because of the dust mess.
The pillowcase acts as a dust trap, containing all the debris instead of letting it fall onto your furniture and floors. It’s genius in its simplicity and effectiveness.
I’ve found this method works best for regular maintenance cleaning. For fans that haven’t been cleaned in over a year, you might need to combine it with a wet cleaning method afterward.
Not everyone can or wants to climb a ladder to clean their ceiling fans. Whether you have mobility issues, extremely high ceilings, or simply prefer to keep your feet on the ground, these solutions will get the job done safely.
⚠️ Important: Always ensure your extendable tool is long enough to reach comfortably without standing on furniture. Never use unstable chairs or tables as substitutes for proper equipment.
Static dusters use electrostatic attraction to trap dust effectively. They work particularly well on smooth-finish blades.
Some vacuum cleaners come with ceiling fan attachments or extendable wands that can reach high ceilings.
For really high ceilings (12+ feet), consider investing in a professional-grade extendable system or hiring a cleaning service that specializes in high-reach cleaning.
Regular maintenance prevents heavy buildup and makes cleaning easier each time. Based on my experience with hundreds of homes, here’s what works best.
Quick Summary: Clean fans at least quarterly, with monthly dusting in high-use areas. Kitchen fans need more frequent attention due to grease buildup.
Change your fan’s direction seasonally for optimal efficiency. This is also the perfect time for a thorough cleaning.
I’ve seen it all when it comes to ceiling fan cleaning mistakes. Here are the most common ones and how to avoid them.
Avoid feather dusters that just move dust around. They create more airborne particles and don’t actually clean the blades. Paper towels are another poor choice—they leave lint and fall apart when damp.
Spraying cleaning solution onto a running or stationary fan can damage the motor and create a mess as overspray lands on walls and furniture. Always spray your cleaning cloth, not the fan itself.
While you shouldn’t open the motor housing, many people forget to wipe the exterior. Dust on the motor housing can impede airflow and cause overheating.
This is both dangerous and ineffective. A fan that accidentally turns on while you’re cleaning could cause injury or damage. Always cut power at the breaker.
Overly wet cloths can damage the fan’s finish and potentially reach electrical components. Your cloth should be damp, not dripping.
If the fan has been running, wait at least 30 minutes before cleaning. A warm motor combined with cleaning liquids can create safety hazards.
Dirty light fixtures reduce brightness and can even become fire hazards if dust buildup is severe enough. Always clean globes and bulbs while you’re at it.
Sometimes the cleaning process can slightly shift blade positions, causing wobbling. Always test the fan at each speed before finishing.
✅ Pro Tip: Keep a ceiling fan cleaning kit in a closet with all necessary supplies. When everything is ready to go, you’re more likely to clean regularly.
The pillowcase method is by far the easiest way to clean a ceiling fan without making a mess. Simply slide a pillowcase over each blade, press firmly, and pull straight off. All the dust stays trapped inside the pillowcase instead of falling on your furniture.
The most common mistakes include using feather dusters that just spread dust around, spraying cleaner directly on the fan, forgetting to turn off power at the breaker, using too much water on blades, neglecting to clean light fixtures, and not checking fan balance after cleaning.
Ceiling fans should be cleaned at least every 3 months for regular use. Kitchen fans need monthly cleaning due to grease buildup. Homes with pets or allergy sufferers should clean monthly. For optimal performance and air quality, light dusting between deep cleans is recommended.
To clean a ceiling fan without removing covers, use an extendable duster with a U-shaped head that cleans both blade sides at once. For deeper cleaning, use the pillowcase method or carefully wipe blades with a damp microfiber cloth while supporting them to prevent bending.
Yes! A clean ceiling fan can improve efficiency by up to 30%. Dust buildup creates drag on the blades, making the motor work harder to move air. Regular cleaning reduces energy consumption, improves airflow, and helps maintain the fan’s balance for quieter operation.
The best tools for cleaning ceiling fans include microfiber cloths for general cleaning, an extendable duster with U-shaped head for no-ladder cleaning, and old pillowcases for the no-mess pillowcase method. For kitchen fans, include a degreasing cleaner in your toolkit.
The pillowcase method is the best solution for cleaning without dust everywhere. Slide a pillowcase over each blade and pull straight off—trapping all dust inside. For additional protection, lay down a drop cloth and use damp cloths that trap dust rather than dry methods that spread it.
When cleaning a ceiling fan above a bed, first completely strip the bed and cover the mattress with a plastic sheet or remove it from the room. Use the pillowcase method to contain dust, and consider using a vacuum with a brush attachment for initial dust removal to minimize airborne particles.
After years of cleaning ceiling fans in homes across the country, I can confidently say that regular fan maintenance is one of the most overlooked yet impactful home maintenance tasks. The difference between a clean and dirty ceiling fan isn’t just visual—it affects your air quality, energy efficiency, and even your health.
For most homes, the pillowcase method combined with quarterly deep cleaning will keep your fans running optimally. Kitchen fans require more attention, but the payoff in reduced grease buildup and improved air quality is worth the extra effort.
Remember that consistency is key. Set calendar reminders for seasonal cleaning and direction changes. Keep your cleaning supplies organized and accessible. And never underestimate the importance of safety—always turn off power at the breaker and use proper ladder techniques.
By following this guide, you’ll not only have cleaner ceiling fans but also better air quality, lower energy bills, and fans that last longer. It’s a simple maintenance task that pays dividends in comfort and savings throughout the year.