
Whether your ceiling fan is noisy, outdated, or simply not working anymore, removing it yourself is totally achievable with the right preparation. I’ve removed dozens of ceiling fans over the years, and let me tell you – my first attempt took me 3 hours instead of the 30 minutes I expected, but I learned valuable lessons that I’m sharing with you here.
Yes, you can remove a ceiling fan yourself if you follow proper safety procedures and have basic tools. This guide will walk you through the entire process, from shutting off power to dealing with those frustrating hidden screws that seem to plague every fan installation.
Most ceiling fans can be removed in 45-90 minutes if you have experience, but beginners should plan for 2-3 hours. The process involves disconnecting electrical wiring, removing mounting hardware, and safely lowering the fan assembly – all while working from a ladder.
This comprehensive guide covers both flush mount and downrod fans, includes troubleshooting for common problems, and helps you decide when it’s time to call a professional. By the end, you’ll have the confidence to tackle this DIY project safely and efficiently.
Electrical work can be dangerous, but proper safety precautions make ceiling fan removal a manageable DIY project. I can’t stress this enough: never skip safety steps, even if you’re in a hurry. The few extra minutes you spend on safety can prevent serious injury or expensive electrical damage.
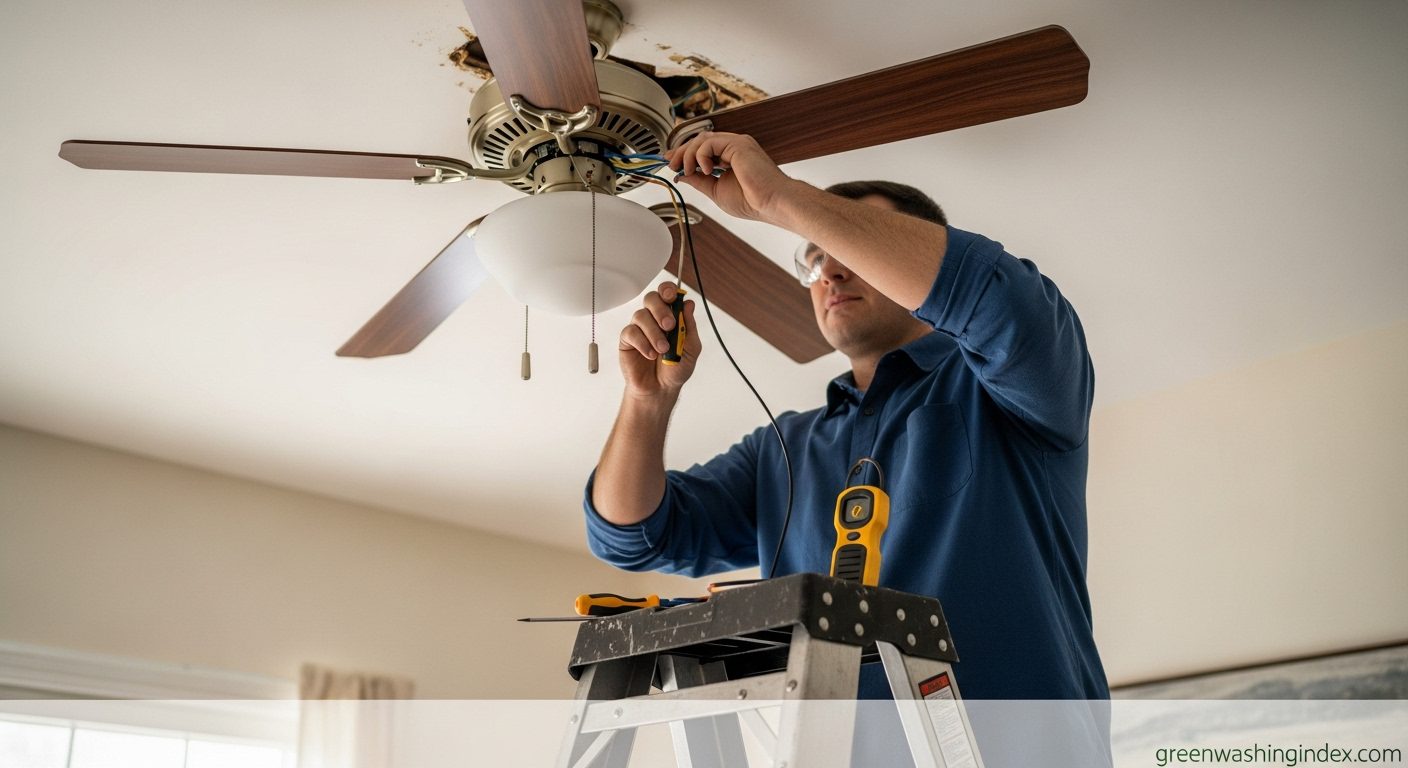
Electrical Safety First: Always turn off power at the circuit breaker, not just at the wall switch. Many homes have multiple switches controlling ceiling fans, and some fans have residual power even when switched off. Use a voltage tester to confirm power is completely off before touching any wires. I learned this the hard way when I got a minor shock because I only turned off the wall switch.
Weight Management: Ceiling fans are surprisingly heavy – most weigh between 15-50 pounds. Never try to hold the fan’s full weight while removing screws. Always have a helper or use a support system. I once watched a friend drop a fan while working alone, resulting in $800 in floor repairs and a broken fan.
Stable Ladder Setup: Use a sturdy step ladder or extension ladder rated for your weight plus the fan’s weight. Place it on level ground and ensure it’s fully opened and locked. Consider a ladder stabilizer if you’re working on high ceilings or uneven surfaces.
⚠️ Important: If your fan has been installed for more than 10 years or shows signs of rust, corrosion, or loose mounting, consider hiring a professional. Old electrical connections can become brittle, and rusted mounting bolts may require special tools to remove safely.
Insurance and Liability: Check your homeowner’s insurance policy before starting. Some policies have exclusions for DIY electrical work. If you’re renting, get written permission from your landlord before attempting any modifications.
Having the right tools makes ceiling fan removal significantly easier and safer. I’ve put together this comprehensive list based on my experiences removing various fan types. You don’t need professional-grade tools, but quality basic tools will save you frustration.
Essential Tools:
Helpful but Optional:
✅ Pro Tip: Set up your workspace before climbing the ladder. Lay down your drop cloth, organize tools within reach, and have your helper position themselves to catch the fan if needed. This prevents multiple trips up and down the ladder.
This is the most critical step for your safety. Don’t rush through it! I always triple-check that power is off before proceeding, and you should too. Electrical shock can cause serious injury or death, so take your time with this step.
Voltage Tester: A device that detects electrical current without direct contact. Non-contact models use electromagnetic sensors to detect live wires and are essential for DIY electrical safety.
If your fan is controlled by multiple switches or has remote control features, make sure to test all possible power sources. Some fans have separate circuits for the fan motor and light kit.
With power confirmed off, it’s time to disassemble the removable parts. Removing the light kit and blades first makes the fan much lighter and easier to handle. This step typically takes 10-15 minutes, but take your time to avoid damaging components you might want to reuse.
Removing Light Fixtures:
Removing Fan Blades:
⏰ Time Saver: Take photos with your phone before disconnecting any wires. This is especially helpful if you’re installing a new fan later. Also, keep a small container handy for hardware – those tiny screws have a way of disappearing!
Flush mount fans (also called hugger fans) mount directly to the ceiling without a downrod. They’re common in rooms with low ceilings (under 8 feet) and have a slightly different removal process than downrod fans. I find these often have hidden screws that can be frustrating to locate.
⚠️ Important: Never cut electrical wires! Always disconnect them properly using wire nuts. Cut wires can be difficult to reconnect properly and may create safety hazards for future installations.
Downrod fans hang from a metal pipe and are common in rooms with standard or high ceilings (8+ feet). These use a ball and socket mechanism that can be tricky to release. The key is understanding how the ball socket works before starting.
Some older fans use a J-hook system instead of a ball socket. These have a hook that catches on a mounting plate and require slightly different removal techniques. If you encounter this system, look for a retaining pin or screw that must be removed before the fan can be unhooked.
The mounting bracket is the metal plate that attaches to your electrical box and supports the fan. Removing it completes the fan removal process and prepares the space for your new fixture or fan. This step is usually straightforward but can be challenging with older hardware.
If the mounting bracket is rusted or corroded, apply penetrating oil and let it sit for 15-20 minutes before trying again. Never use excessive force – you could damage the electrical box, which would require professional repair.
Every fan removal has its challenges. After helping friends and family with countless fan removals, I’ve encountered most common problems. Here are solutions to issues you might face during your project.
Hidden or Invisible Screws:
Stuck or Rusted Hardware:
Canopy Won’t Come Off:
Ball Socket Won’t Release:
Working Alone Solutions:
Penetrating Oil: A low-viscosity oil that seeps into tight spaces to loosen rusted or corroded metal parts. Essential for DIY projects involving older hardware that hasn’t been moved in years.
While most ceiling fan removals are DIY-friendly, some situations require professional help. I’ve seen DIY attempts go wrong, costing more than hiring a professional from the start. Here’s when to pick up the phone instead of your tools.
Call a Professional If:
⚠️ Important: If you see sparks, smell burning, or notice melted insulation when removing the fan, stop immediately and call an electrician. These are signs of serious electrical problems that require professional attention.
Professional Costs:
Based on my research and forum discussions, professional ceiling fan removal typically costs $150-400, depending on your location and the complexity of the job. This includes:
Finding Qualified Help:
Look for licensed electricians with good reviews. Ask for references and verify their license with your state’s licensing board. Get at least three quotes and ask about their experience with ceiling fans specifically.
Removing your ceiling fan responsibly is just as important as removing it safely. I’ve learned that most fan components can be recycled or reused, keeping them out of landfills. Here’s how to dispose of your old fan in an environmentally friendly way.
Recycling Options:
Donation Possibilities:
Responsible Disposal:
If the fan is beyond repair, dispose of it properly. Never put electronic components in regular trash. Contact your local waste management for specific disposal guidelines in your area.
✅ Pro Tip: Keep the mounting hardware and screws in a labeled baggie. You never know when you might need them for future projects, and small hardware is expensive to buy individually.
Remember that proper disposal isn’t just good for the environment – in many areas, it’s the law. Electronic waste often contains materials that shouldn’t go to landfills, including lead, mercury, and other hazardous substances.
Yes, most homeowners can remove a ceiling fan themselves with basic tools and proper safety precautions. The process typically takes 45-90 minutes if you have experience, or 2-3 hours for beginners. Key requirements include turning off power at the circuit breaker, having a helper for heavy parts, and using a voltage tester to verify power is off.
You generally don’t need an electrician for basic fan removal, but hire one if you have aluminum wiring, can’t locate the circuit breaker, or encounter damaged electrical components. Professional help costs $150-400 but prevents potentially dangerous mistakes. Electricians are essential for homes built before 1972 or if you notice burning smells, sparking, or melted wires.
Hidden screws are common in ceiling fans. Check under decorative caps, trim rings, or manufacturer logos that pry off. Some fans hide screws inside light sockets or under the canopy. Hunter fans often hide screws behind the center medallion. Use a flashlight and mirror to spot hidden screw heads, and gently pry decorative elements with a flathead screwdriver to reveal mounting hardware.
Yes, it’s safe if you follow proper procedures: always turn off power at the circuit breaker (not just the wall switch), verify with a voltage tester, have a helper for heavy parts, and use a sturdy ladder. Never work alone with fans over 30 pounds, and stop immediately if you encounter aluminum wiring or damaged electrical boxes. When in doubt, consult a professional.
Essential tools include a step ladder, voltage tester, Phillips and flathead screwdrivers, nut driver set, wire stripper, and pliers. Helpful items include magnetic parts tray, work gloves, safety glasses, and a drop cloth. Total cost for basic tools is typically $50-100 if you don’t already own them. Quality tools make the job easier and safer.
Experienced DIYers typically need 45-90 minutes for standard fan removal. Beginners should plan 2-3 hours, especially if complications arise. Factors affecting time include fan type, accessibility, rusted hardware, and helper availability. Working alone adds 30-60 minutes to the job. Allow extra time for fans installed before 2000, which often have corroded or painted hardware.
Yes, you can reuse a fan if it’s less than 10 years old, shows no rust or wobble, and all parts are intact. Clean blades thoroughly, check for loose screws, and test the motor before reinstalling. Never reuse fans with damaged wiring, bent blades, or unusual noises. For fans removed due to performance issues, consider repairs before reuse – replacement parts often cost less than a new fan.
Congratulations! You’ve successfully removed your ceiling fan. After removing dozens of fans over the years, I’ve learned that proper cleanup and preparation for the next step makes future projects much easier.
Immediate Next Steps:
Planning Your Next Move:
Now that you’ve mastered fan removal, you might consider installing a new energy-efficient model. Modern ceiling fans use up to 70% less electricity than older models and can significantly reduce your cooling costs. When shopping, look for Energy Star certified models with DC motors – they’re quieter and more efficient than traditional AC motors.
For better improving home air circulation, consider the placement and size of your new fan carefully. A properly sized and installed fan can make your rooms feel 4-6 degrees cooler, allowing you to raise your thermostat and save on energy bills.
Remember the Safety Lessons:
Whether you’re replacing with a modern smart fan, a simple light fixture, or just patching the ceiling, you’ve saved yourself $150-400 by doing it yourself. More importantly, you’ve gained confidence in your DIY abilities and electrical safety knowledge.
For more DIY home improvement projects and energy-saving tips, explore our other guides. And if you’re dealing with other electrical issues, proper circuit breaker safety is essential knowledge for any homeowner.