

If your Mantis tiller is stalling, running rough, or won’t start properly, I’ve got good news – you can fix most carburetor issues yourself in about 30 minutes. After working on these 2-stroke engines for years, I’ve learned the exact adjustment process that works every time.
Last spring, my own Mantis tiller wouldn’t idle properly after winter storage. The engine would surge, sputter, and die whenever I released the throttle. Sound familiar? The solution was simpler than I expected – just a few careful turns of the carburetor adjustment screws got it running like new again.
In this guide, I’ll walk you through the entire carburetor adjustment process step by step. We’ll cover how to identify which screws to turn, the correct adjustment sequence, and what to do when things don’t go as planned. Plus, I’ll share the troubleshooting tricks that have saved me countless trips to the repair shop.
Before we dive into adjustments, let’s make sure we’re dealing with a carburetor issue. Your Mantis tiller’s carburetor likely needs adjustment if you’re experiencing any of these problems:
Starting problems: The engine won’t start after multiple pulls, or it starts but immediately dies. This often happens after seasonal storage when old fuel has gummed up the carburetor jets.
Idle issues: The tiller won’t idle smoothly – it either races at high speed or stalls when you release the throttle. I see this problem constantly in tillers that haven’t been adjusted in several seasons.
Power loss: Your tiller bogs down when you engage the tines or try to till through compacted soil. The engine might also produce black smoke, indicating it’s running too rich.
Surging or hunting: The engine speed fluctuates up and down even when you’re holding the throttle steady. This rhythmic surging usually means the mixture screws need fine-tuning.
Excessive fuel consumption: If you’re refilling the tank more often than usual, the carburetor might be delivering too much fuel to the engine.
Before starting any carburetor work, gather these essential tools. Having everything ready makes the job go much smoother:
Required tools:
Optional but helpful:
⚠️ Safety Warning: Always work on your tiller outdoors or in a well-ventilated area. Carburetor cleaner fumes are toxic, and running engines produce carbon monoxide. Never attempt adjustments while the engine is hot – wait at least 30 minutes after use.
The Mantis tiller uses a simple diaphragm carburetor with two adjustment screws that control the fuel-air mixture. Understanding what each screw does helps you make the right adjustments:
The “L” screw (Low speed): This screw controls the fuel mixture at idle and low throttle. It’s usually marked with an “L” or located closest to the engine. Turning it clockwise leans the mixture (less fuel), while counterclockwise richens it (more fuel).
The “H” screw (High speed): This adjusts the mixture at full throttle. It’s marked “H” or positioned farther from the engine. Like the L screw, clockwise means leaner, counterclockwise means richer.
Some newer Mantis models have EPA-mandated limiter caps on these screws that prevent over-adjustment. If your screws won’t turn past a certain point, don’t force them – that’s the limiter doing its job. You can still make effective adjustments within the limited range.
The carburetor also has an idle speed screw (sometimes called the throttle stop screw) that sets how fast the engine runs at idle. This is separate from the mixture screws and simply controls how far the throttle plate stays open when you release the trigger.
Now for the main event – adjusting your carburetor. Follow these steps carefully, and take your time. Rushing through adjustments is the number one mistake I see people make.
Start with a clean air filter. Remove the air filter cover (usually held by one or two screws) and inspect the filter. If it’s dirty, clean it with warm soapy water and let it dry completely. A clogged filter makes accurate carburetor adjustment impossible.
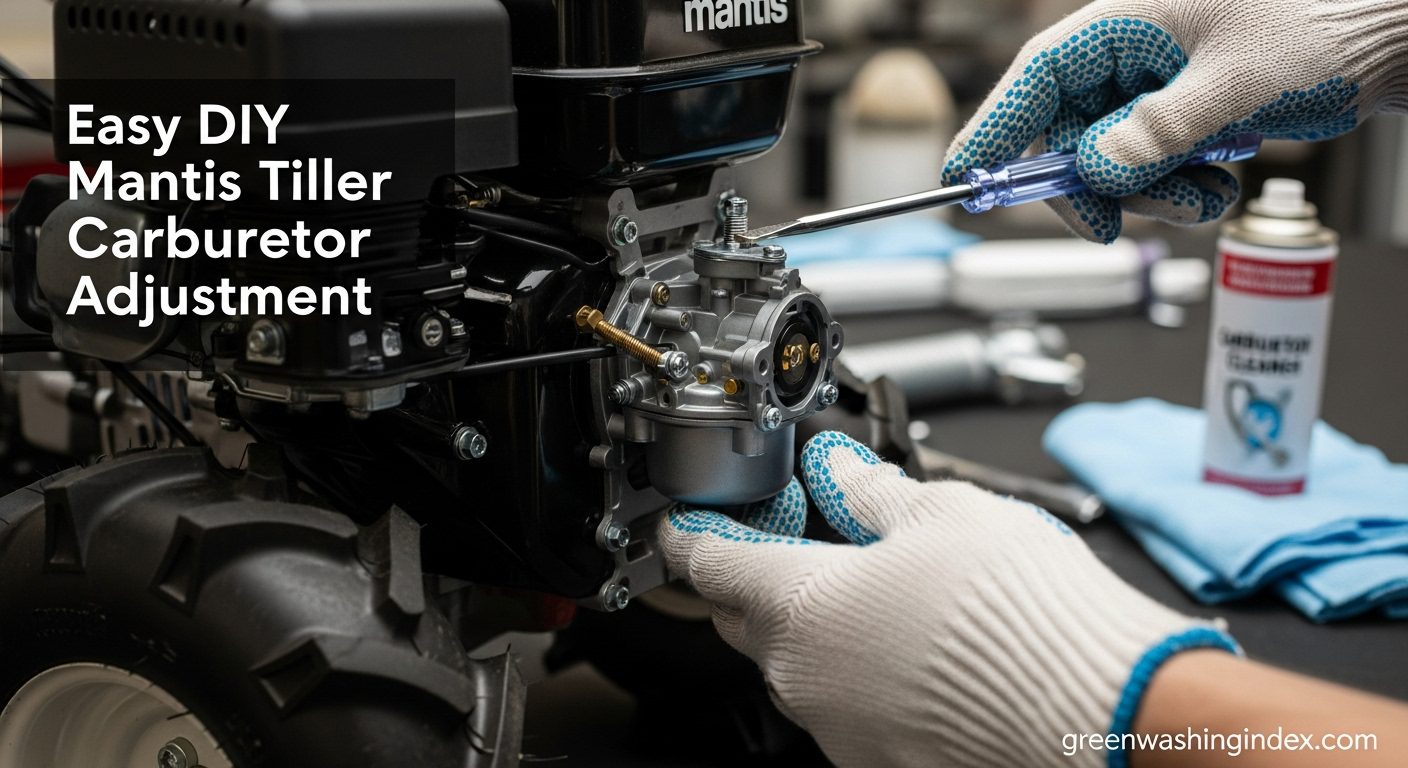
Next, locate the adjustment screws on your carburetor. On most Mantis tillers, they’re on the side of the carburetor body, accessible without removing any covers. Clean around the screws with carburetor cleaner to remove any dirt that might fall into the carburetor when you adjust them.
Turn both the H and L screws clockwise until they gently seat (don’t overtighten). Then back each screw out 1.5 turns counterclockwise. This gives you a baseline setting that should allow the engine to start.
Fill the tank with fresh 50:1 fuel mix if needed. Old fuel causes more carburetor problems than anything else, so always use fuel less than 30 days old. Prime the carburetor by pressing the primer bulb 5-6 times until you see fuel in the bulb.
Set the choke to the closed position and pull the starter cord. The engine should start within 3-5 pulls. Once it fires, immediately move the choke to half-open, then fully open as the engine warms up.
Let the engine run for 2-3 minutes to reach operating temperature. A cold engine won’t respond accurately to carburetor adjustments, so patience here pays off.
With the engine warmed up and idling, we’ll start with the low-speed adjustment. This is the most critical adjustment since it affects how the engine runs most of the time.
Listen to the engine at idle. If it’s running rough or threatening to stall, slowly turn the L screw counterclockwise (richer) in 1/8 turn increments until it smooths out. If the idle is too fast or racing, turn the screw clockwise (leaner) using the same small increments.
The sweet spot is when the engine idles smoothly without smoking excessively. Once you find it, quickly blip the throttle. The engine should accelerate smoothly without hesitation. If it bogs or hesitates, turn the L screw counterclockwise another 1/8 turn.
Fine-tune by turning the screw in tiny increments until you get the smoothest idle and best throttle response. Write down how many turns out from seated your final setting is – this information is gold if you need to reset later.
Now we’ll adjust the high-speed mixture. This affects how the engine runs at full throttle, which is crucial for tilling performance.
Run the engine at full throttle. If you have a tachometer, you’re aiming for about 7,000-7,500 RPM for most Mantis models. Without a tachometer, listen for a smooth, steady sound without any four-stroking (a stuttering sound that indicates an overly rich mixture).
If the engine four-strokes or sounds sluggish at full throttle, turn the H screw clockwise in 1/8 turn increments until it cleans up. If it sounds harsh or seems to be over-revving, turn it counterclockwise to richen the mixture.
The correct setting produces maximum power without over-revving. Test it by engaging the tines in soil – the engine should maintain steady power without bogging down. If it bogs under load, richen the mixture slightly by turning the H screw counterclockwise.
After adjusting the mixture screws, you might need to reset the idle speed. The idle speed screw is usually a larger screw that contacts the throttle linkage.
With the engine idling and properly warmed up, turn the idle speed screw clockwise to increase idle speed or counterclockwise to decrease it. You want the engine to idle steadily at a speed where the tines don’t engage – usually around 2,800-3,000 RPM.
The tines should remain stationary at idle but engage immediately when you squeeze the throttle. If the tines creep or spin at idle, the idle speed is too high and poses a safety hazard.
Once you’ve made all adjustments, put the tiller through its paces. Run it through various throttle positions, checking for smooth transitions and steady operation. Till a small patch of garden to verify it has good power under load.
The engine should start easily, idle smoothly, accelerate without hesitation, and deliver full power when tilling. If any of these aspects aren’t quite right, go back and fine-tune the relevant adjustment screw.
Even with careful adjustment, you might encounter some stubborn issues. Here’s how to solve the most common problems I see:
Engine won’t idle no matter how you adjust the L screw: This usually means the carburetor needs cleaning, not just adjustment. Remove the carburetor and clean all passages with carburetor cleaner and compressed air. Pay special attention to the tiny idle circuit ports.
Engine runs great at idle but dies at full throttle: The main jet might be clogged. Also, check that the fuel tank vent isn’t blocked – a vacuum in the tank will starve the engine of fuel at high demand.
Adjustments don’t seem to change anything: If turning the screws has no effect, the carburetor’s internal passages are likely clogged. You’ll need to remove and thoroughly clean or rebuild the carburetor.
Engine surges constantly: Surging often indicates an air leak. Check the carburetor mounting gasket, fuel lines, and primer bulb for cracks. Even a tiny air leak wreaks havoc with mixture control.
Can’t get enough power even with proper adjustment: Check compression with a gauge – it should be at least 90 PSI. Low compression from worn rings means the engine needs more extensive repairs beyond carburetor adjustment.
Not every carburetor problem requires adjustment. Sometimes cleaning is the real solution. Here’s how to decide:
Adjust when: The tiller has been running but gradually developed problems, you’ve changed altitude significantly (more than 2,000 feet), or it’s been more than a season since the last adjustment.
Clean when: The tiller sat unused for months, old fuel was left in the system, adjustments have no effect, or you see visible dirt or varnish in the carburetor.
I recommend cleaning the carburetor annually as preventive maintenance. It’s easier to maintain a clean carburetor than to resurrect a completely gummed-up one.
Proper seasonal maintenance prevents most carburetor problems. Here’s my maintenance schedule that keeps tillers running reliably:
Spring startup: Replace old fuel, check and adjust carburetor settings, clean air filter, and replace spark plug if it’s been a year. Run the engine for 10 minutes to ensure everything works properly before you need it.
Mid-season checkup: Clean the air filter monthly during heavy use. Check carburetor adjustments if you notice any performance changes. Keep using fresh fuel – don’t let it sit in the tank more than 30 days.
Fall preparation: Before storage, run the carburetor dry or add fuel stabilizer to prevent varnish buildup. Clean the air filter one final time and spray fogging oil into the carburetor while the engine runs to protect internal parts.
Winter storage: Store the tiller in a dry location. If you didn’t run it dry, start it monthly and let it run for 5 minutes to keep the carburetor circuits clear. This prevents the grief of springtime carburetor rebuilds.
Modern Mantis tillers must comply with EPA emissions regulations, which affects carburetor adjustments. The limiter caps on adjustment screws prevent settings that would cause excessive emissions.
Regarding warranty, basic carburetor adjustments typically don’t void your warranty since they’re considered normal maintenance. However, removing limiter caps or modifying the carburetor definitely will. Stick to adjustments within the factory-limited range.
If your tiller is under warranty and has carburetor problems beyond what adjustment can fix, take it to an authorized dealer. Attempting carburetor removal or rebuild yourself might void coverage for future issues.
Let’s talk money. Adjusting the carburetor yourself costs nothing but time – about 30 minutes once you know the process. The only expense might be carburetor cleaner spray (about $5) if you don’t already have it.
Professional carburetor adjustment typically runs $75-150 at small engine shops. They’ll often include air filter cleaning and spark plug replacement in that price, but you’re still paying for labor you can easily do yourself.
If the carburetor needs rebuilding, shops charge $150-250 including parts and labor. A DIY rebuild kit costs $15-30, making this another opportunity for significant savings if you’re comfortable with basic mechanical work.
For complete carburetor replacement, expect to pay $200-300 at a shop versus $50-100 for the part if you install it yourself. The installation takes about an hour with basic tools.
Once you’ve mastered basic adjustment, these advanced tips will help you squeeze every bit of performance from your Mantis tiller:
Altitude compensation: For every 1,000 feet above sea level, lean the mixture slightly by turning both screws clockwise 1/16 turn. High altitude means less air density, requiring less fuel for the proper mixture.
Temperature adjustments: Cold weather operation (below 40°F) benefits from a slightly richer mixture. Turn both screws counterclockwise 1/8 turn when working in cold conditions.
Fuel quality matters: Use ethanol-free fuel when possible. Ethanol attracts moisture and causes carburetor corrosion. If you must use ethanol fuel, never let it sit in the system more than two weeks.
Break-in adjustments: New engines run lean during break-in. After the first 5 hours of operation, readjust the carburetor for optimal performance as the engine loosens up.
asd
Q: How often should I adjust my Mantis tiller carburetor?
A: Check carburetor adjustment at the start of each season and any time you notice performance issues. Most tillers need adjustment once or twice per year with regular use.
Q: Can I damage my engine with incorrect carburetor adjustment?
A: Running too lean (not enough fuel) can cause overheating and engine damage. That’s why we always start rich and gradually lean the mixture. The limiter caps on modern tillers prevent dangerously lean settings.
Q: Why does my tiller run fine for 10 minutes then start acting up?
A: This sounds like vapor lock from a failing fuel tank vent. Check that the fuel cap vent isn’t clogged. You can test this by loosening the cap when problems start – if performance improves, replace the fuel cap.
Q: Should I use seafoam or other fuel additives?
A: Fuel stabilizers help prevent carburetor problems during storage. Cleaning additives can help minor varnish issues but won’t fix a seriously clogged carburetor. Use them preventively, not as a cure.
Q: The adjustment screws on my tiller won’t turn – are they stuck?
A: You’re probably hitting the EPA limiter caps. Don’t force them – you can still adjust within the limited range. If they’re truly stuck from corrosion, spray penetrating oil and let it soak before trying again.
Q: My tiller only runs with the choke partially closed – what’s wrong?
A: This indicates a lean condition, usually from a vacuum leak or clogged jet. Check all gaskets and fuel lines for leaks. If those are good, the carburetor needs thorough cleaning.
Q: Can I adjust the carburetor to get more power from my tiller?
A: Proper adjustment ensures you’re getting all the designed power. You can’t safely increase power beyond factory specifications through carburetor adjustment alone – that would require engine modifications.
Q: Is it normal for my tiller to smoke a little after carburetor adjustment?
A: Light blue smoke is normal for 2-stroke engines, especially on startup. Black smoke indicates an overly rich mixture – lean it out slightly. White smoke suggests water in the fuel or severe engine wear.
asd
Adjusting your Mantis tiller carburetor doesn’t require special expertise – just patience and attention to detail. With the step-by-step process I’ve outlined, you can diagnose and fix most carburetor issues in under 30 minutes.
Remember the key points: always start with clean fuel and a clean air filter, make small adjustments and test between changes, and listen to what the engine is telling you. That surging, stuttering, or stalling is the engine’s way of communicating what it needs.
Regular carburetor maintenance pays huge dividends. A properly adjusted carburetor means easier starting, better fuel economy, more power for tough tilling jobs, and longer engine life. Plus, you’ll save hundreds of dollars in repair shop costs over the life of your tiller.
The next time your Mantis tiller starts acting up, don’t immediately assume you need expensive repairs. Grab your screwdriver, follow these adjustment steps, and you’ll likely have it purring again in no time. Once you’ve successfully adjusted your carburetor a few times, it becomes second nature – just another simple maintenance task that keeps your equipment running reliably season after season.