
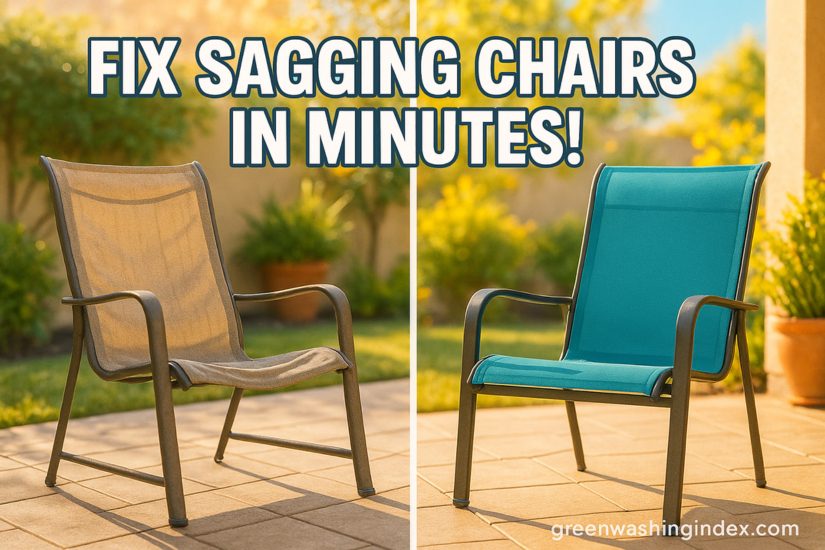
I’ve spent the last decade maintaining outdoor furniture, and nothing frustrates me more than watching perfectly good patio chairs end up in landfills because of simple sagging issues. The truth is, most sagging patio chairs can be fixed in under an hour with basic tools and materials you probably already have.
Last spring, I rescued six patio chairs from my neighbor’s curb that were destined for the dump. After $40 in materials and an afternoon of work, those chairs now grace my deck and will likely last another 10 years. This guide shows you exactly how I did it and how you can save your own chairs from the same fate.
Repairing your patio chairs instead of replacing them saves an average of $75-150 per chair and keeps approximately 20 pounds of furniture out of landfills. In 2025, with environmental consciousness at an all-time high, fixing what we have makes more sense than ever – both financially and ecologically.
Understanding why chairs sag helps you fix them properly and prevent future problems. I’ve repaired hundreds of chairs over the years, and the causes are almost always predictable.
UV damage ranks as the number one culprit. The sun’s rays break down synthetic materials, causing straps and slings to stretch and lose elasticity. I see this especially with chairs that face west or south without any shade protection. The material literally deteriorates at a molecular level, becoming brittle and weak.
Weight stress comes second. Most patio chairs are designed for 250-300 pounds, but repeated use at near-capacity creates permanent stretching. The stress concentrates at attachment points, gradually pulling the material loose from its moorings.
Weather cycling accelerates all damage. When materials get wet, they expand. When they dry and heat up, they contract. This constant movement weakens fibers and loosens fasteners. I’ve noticed chairs stored outdoors year-round fail twice as fast as those brought in during winter.
Frame issues compound sagging problems. Aluminum frames bend slightly under weight, and that tiny bend changes the geometry enough to create slack in the seating surface. Steel frames rust at connection points, weakening the overall structure.
Before starting any repair, gather your tools. I keep a dedicated patio furniture repair kit that has saved me countless trips to the hardware store.
You’ll need a drill with both Phillips and flat-head bits. I prefer cordless models for outdoor work. Add a set of Allen wrenches (most patio furniture uses metric sizes), needle-nose pliers, and wire cutters. A rubber mallet proves invaluable for stubborn parts that need gentle persuasion.
For measuring and marking, keep a tape measure, permanent marker, and straight edge handy. Safety glasses protect your eyes from flying debris when removing old materials. Work gloves prevent cuts from frayed edges and sharp corners.
Sling chairs require replacement fabric (measure twice before ordering), heavy-duty thread, and a sewing awl for thick materials. I buy sling fabric online in bulk – it’s 60% cheaper than retail stores.
Strap chairs need vinyl strapping (sold by the foot), rivets or screws for attachment, and end caps to prevent fraying. Buy 10% extra strapping to account for mistakes and future repairs.
Mesh chairs use specialized mesh fabric and spline (the rubber cord that holds mesh in place). The spline roller tool makes installation much easier and creates professional-looking results.
For all chair types, keep rust-resistant screws, bolts, and washers in various sizes. WD-40 or similar penetrating oil helps remove stubborn fasteners. Sandpaper (220-grit) smooths rough edges that could damage new materials.
Sling chairs represent about 40% of all patio seating, and they’re actually the easiest to repair once you understand the process.
Start by photographing how the original sling attaches – this reference saves confusion during reassembly. Remove the spreader bars (the rails that hold the sling taut) by unscrewing them from the frame. These often hide under plastic caps that pop off with gentle prying.
Slide the old sling out of its channels. If it’s stuck, spray WD-40 into the channels and wait five minutes. Never force it – aluminum channels bend easily and replacements cost more than new chairs.
Lay the old sling flat and measure its dimensions. Add two inches to the width for hem allowances and three inches to the length for attachment loops. This extra material ensures a snug fit without over-stretching.
Quality sling fabric runs $8-12 per yard. I recommend Phifertex or Sunbrella brands – they last 7-10 years versus 2-3 for cheaper alternatives. The extra $20 investment pays for itself in durability.
Cut the fabric with sharp scissors or a rotary cutter. Seal the edges immediately with a lighter or heat gun to prevent fraying. This step takes two minutes but adds years to the repair.
Create reinforced hems by folding the fabric edges twice and sewing with heavy-duty thread. I use upholstery thread that withstands outdoor conditions. Double-stitch for strength – this is where most repairs fail.
Thread the sling through the chair channels, starting at the top. Work slowly to avoid snagging. Once positioned, reattach the spreader bars finger-tight first, then adjust for proper tension. The sling should feel firm but have slight give when you press the center.
Test the repair with your full weight before final tightening. The sling might stretch slightly during first use, so I return after a week to make final adjustments.
Vinyl strap chairs dominate the budget patio furniture market. While individual straps fail, the frames usually last decades with proper care.
Examine each strap individually. Look for stretching, discoloration, brittleness, or attachment point damage. I mark damaged straps with tape for systematic replacement. Even if only half the straps show damage, consider replacing them all – the labor is the same, and mismatched straps look unprofessional.
Remove straps by drilling out rivets or unscrewing attachment points. Save one intact strap as a template. Count the exact number of straps and note their spacing – this varies by manufacturer.
Clean the frame holes with a wire brush to remove corrosion. This improves the connection and prevents future rust. Spray the cleaned holes with rust-inhibiting primer if you see any corrosion.
Cut new straps using your template, adding one inch for attachment. Quality vinyl strapping costs about $2 per foot – avoid the cheap stuff that stretches immediately.
Attach one end with a rivet or screw, stretch the strap across the frame with 10-15% tension, and secure the opposite end. I use a strap stretching tool for consistent tension, but strong hands work too.
Alternate between vertical and horizontal straps if your chair uses a basket weave pattern. This distributes weight evenly and prevents future sagging. The entire process takes about 90 minutes for a standard chair.
Aluminum frames bend but rarely break. I’ve successfully straightened dozens of “ruined” frames that owners thought were beyond repair.
Place the chair on a flat surface and identify where the frame deviates from level. Mark these spots with tape. For minor bends (less than an inch), apply steady pressure with your hands while bracing the frame.
Serious bends require more force. I use a pipe wrench wrapped in cloth to prevent scratching. Apply pressure gradually – aluminum work-hardens and becomes brittle if bent too quickly. Stop immediately if you see stress cracks or white marks indicating metal fatigue.
Common failure points include arm attachments, leg joints, and back recline mechanisms. Strengthen these areas with aluminum angle brackets, available at any hardware store for under $5 each.
Drill pilot holes slightly smaller than your screw diameter to ensure tight connections. Use stainless steel screws to prevent galvanic corrosion between dissimilar metals. Apply a drop of thread locker to prevent loosening from vibration.
For chairs with wobbling issues, add adjustable foot pads. These compensate for uneven surfaces and protect the frame from ground moisture. I buy them in bulk for about $1 each.
Cushioned patio chairs offer comfort but require different repair approaches than sling or strap models.
Old cushions compress and lose support, creating that uncomfortable “bottoming out” feeling. Before replacing expensive cushions, try restoration.
Remove cushion covers and expose the foam. If the foam is yellowed but intact, it’s salvageable. Place the foam in direct sunlight for 2-3 hours – UV exposure causes expansion in compressed foam cells. I’ve restored 5-year-old cushions to near-original thickness with this method.
For severely compressed foam, add a layer of batting or memory foam topper. This costs about $10 per cushion versus $40-60 for replacements. Secure the new layer with spray adhesive designed for outdoor use.
Small tears in cushion covers spread quickly if ignored. Clean the tear area and apply iron-on patches from the inside. Use outdoor fabric patches that match your cushion material.
For larger damage, consider making new covers. Outdoor fabric costs $15-25 per yard, and one yard covers a standard seat cushion. I keep spare fabric from each project for future patches.
Replace zippers rather than fighting with broken ones. Marine-grade zippers cost about $8 and install easily with basic sewing skills. The improvement in functionality justifies the small investment.
Mesh chairs combine durability with breathability, making them popular in hot climates. Their repair requires specific techniques and materials.
Start by removing the spline – the rubber cord holding mesh in place. Use a flat-head screwdriver to pry up one end, then pull steadily. Save the old spline if it’s still flexible; quality spline costs $10-15 per chair.
Photograph the mesh pattern before removal. Some chairs use specific weave patterns for strength. Cut out the old mesh with scissors, leaving the frame channel clean.
Purchase mesh specifically designed for outdoor furniture. Hardware store screen material won’t support body weight. Proper furniture mesh costs $20-30 per yard but lasts much longer.
Lay the mesh over the frame with 2-3 inches of overlap on all sides. Starting at one corner, press the spline into the channel with a spline roller tool. Work in 6-inch sections, keeping the mesh taut but not stretched.
At corners, cut small relief notches in the mesh to prevent bunching. This creates clean corners and prevents stress points that lead to tearing. Trim excess mesh with a utility knife once the spline is fully seated.
Every chair we repair instead of replacing prevents waste and conserves resources. I’ve calculated that repairing one patio chair saves approximately 20 pounds of landfill waste and prevents the carbon emissions associated with manufacturing and shipping a replacement.
When possible, source materials from sustainable outdoor furniture suppliers who prioritize eco-friendly production methods. Many companies now offer recycled and recyclable repair materials that perform as well as virgin products.
Consider forming a neighborhood repair cooperative. Pool tools and bulk-buy materials for significant savings. I organize quarterly repair days where neighbors help each other fix outdoor furniture. We’ve kept over 200 pieces out of landfills in the past three years.
Save all usable hardware from chairs beyond repair. Screws, bolts, brackets, and other components work perfectly in future repairs. I maintain organized bins of salvaged parts that have saved hundreds of dollars in hardware costs.
Preventing sagging extends chair life significantly. I follow a simple maintenance schedule that takes minutes but adds years to furniture life.
Check all attachment points for looseness. Tighten screws and bolts before they work completely free. Loose hardware accelerates wear by allowing excessive movement and stress concentration.
Look for early signs of material degradation – fading, small tears, or stretched areas. Address these immediately before they become major repairs. I keep a repair log to track problem patterns.
Spring requires the most attention. Clean all chairs thoroughly with appropriate cleaners for each material type. Apply UV protectant sprays to fabric and vinyl components. These products cost about $15 per bottle but prevent thousands in replacement costs.
Before winter storage, ensure chairs are completely dry to prevent mold and mildew. Store chairs in a covered area if possible. If outdoor storage is necessary, use quality furniture covers that breathe to prevent moisture buildup.
Apply lubricant to all moving parts twice yearly. This prevents rust and ensures smooth operation of reclining mechanisms. I use silicone spray because it doesn’t attract dirt like oil-based products.
Let’s examine real numbers from my repair experience. Average patio chair replacement costs range from $75 for basic models to $300 for premium brands. Repair costs typically run $15-40 per chair including materials.
I recently repaired a set of six sling chairs for a total cost of $120 – replacement would have cost $900 minimum. The repaired chairs should last another 5-7 years with proper maintenance. Even hiring someone to do the repairs (at $50-75 per hour) saves money compared to replacement.
Beyond direct costs, consider environmental impact. Manufacturing new chairs requires raw materials, energy for production, and fuel for shipping. Repair eliminates these environmental costs entirely while preserving functional furniture.
Time investment varies by repair type. Simple strap replacement takes 30-45 minutes per chair. Sling replacement requires 60-90 minutes. Mesh installation needs about 2 hours including drying time for adhesives. Compare this to shopping time, delivery waiting, and assembly of new chairs.
Safety must come first in any repair project. I’ve seen too many injuries from rushed or careless work.
Always test repaired chairs gradually. Start with gentle pressure, then half your body weight, before sitting normally. Listen for creaking or unusual sounds that indicate stress. If something feels wrong, it probably is.
Wear safety glasses when drilling, cutting, or removing old materials. Flying debris can cause serious eye injuries. I learned this lesson the hard way when a rivet head flew off during removal.
Work in well-ventilated areas when using adhesives or solvents. Many outdoor furniture products contain chemicals that require proper ventilation. Set up fans if working in a garage or enclosed space.
Keep tools sharp and in good condition. Dull tools require more force and increase accident risk. I sharpen cutting tools before each project and replace worn drill bits immediately.
Some repairs exceed DIY capabilities or cost-effectiveness. Welded aluminum frame breaks require professional equipment and expertise. Attempting these repairs without proper tools often causes more damage.
Antique or high-value furniture deserves professional attention. I once ruined a $500 teak chair trying to save $100 on professional restoration. The lesson cost me dearly.
Consider professional help when multiple complex repairs are needed simultaneously. A professional can often complete in hours what might take you days, and their experience prevents costly mistakes.
Warranty considerations matter too. Some manufacturers void warranties for DIY repairs. Check your warranty terms before starting any work on newer furniture.
Developing repair skills pays dividends beyond individual projects. I’ve helped dozens of neighbors fix their furniture, building community connections while preventing waste.
These skills transfer to other household repairs. The confidence gained from successful furniture repair encourages tackling other maintenance projects. My furniture repair knowledge led to fixing window screens, reupholstering indoor furniture, and general home maintenance.
Teaching others multiplies the environmental impact. I’ve taught my kids basic repair skills, ensuring another generation values fixing over replacing. They now spot curbside furniture with potential rather than seeing trash.
Consider documenting your repairs on social media or community boards. Sharing success stories inspires others to try repairs and creates a culture of sustainability. Include your newfound knowledge in your overall backyard landscaping ideas to create a more sustainable outdoor living space.
Fixing sagging patio chairs isn’t just about saving money – it’s about taking responsibility for the items we own and reducing our environmental footprint. Every chair saved from the landfill represents a small victory for sustainability.
I’ve repaired hundreds of chairs over the years, and each one taught me something new. Start with simple repairs and build your skills gradually. That sagging chair on your patio isn’t destined for the dump – with basic tools and a little patience, you can restore it to years of additional service.
The next time you see a neighbor dragging patio furniture to the curb, offer to help repair it instead. Share this knowledge, build community connections, and make a real difference in reducing waste. Our outdoor spaces deserve furniture that lasts, and now you have the knowledge to make that happen.
Take action today. Inspect your patio chairs, identify needed repairs, and gather your materials. That sagging chair will thank you with years of comfortable service, and your wallet and the environment will thank you too.
Don't let aphids, slugs, and caterpillars ruin another plant. Take back control with simple, natural methods that actually work.
