

You’re sweating upstairs while the downstairs feels like an arctic tundra. Sound familiar? If you’re struggling with poor airflow to second floor rooms, you’re not alone. This temperature imbalance affects millions of two-story homes, turning upper floors into saunas during summer months.
Here’s the reality: Hot air naturally rises, but that’s only part of your upstairs cooling problem. Most HVAC systems weren’t designed to overcome the physics of a two-story home efficiently. The good news? You can increase airflow to your second floor starting today with solutions ranging from simple vent adjustments that cost nothing to advanced HVAC modifications that transform your home’s comfort.
Quick Answer: The fastest way to improve upstairs airflow is to set your thermostat fan to “ON” instead of “AUTO,” partially close first-floor vents, and ensure all second-floor vents are fully open and unobstructed. For lasting results, consider increasing return vent size, improving attic insulation, or installing a zoned HVAC system.
This comprehensive guide delivers proven methods to fix ventilation issues and balance airflow in your two-story house. You’ll discover immediate fixes you can implement in minutes, diagnostic steps to identify your specific problem, and long-term solutions that can reduce energy bills by up to 15% while keeping every floor comfortable.
Understanding why your second floor suffers from inadequate airflow is the first step toward finding the right solution. Let’s explore the main culprits behind your hot upstairs cold downstairs situation.
Basic physics works against your comfort. Warm air is less dense than cool air, causing it to rise naturally through your home. This creates a temperature stratification where your second floor can be 5-10 degrees warmer than the first floor, even with your AC running constantly. This natural convection means your HVAC system must work harder to push cool air upstairs while simultaneously removing the accumulated warm air.
Many residential HVAC systems face inherent design challenges when cooling multiple floors. Single-zone systems use one thermostat, typically located on the first floor, to control the entire home’s temperature. When this thermostat reaches the set temperature, the system shuts off, regardless of the second floor’s actual temperature. Additionally, if your system’s blower wasn’t sized correctly for your home’s volume, it may lack the power to effectively circulate air to upper floors.
Your roof acts as a massive solar collector, absorbing heat throughout the day. Without proper attic insulation and ventilation, this heat radiates directly into your second-floor rooms. Dark-colored shingles can reach temperatures exceeding 150°F in summer, creating a heat reservoir that continues warming your upstairs even after sunset. This explains why upstairs rooms often feel hottest in the evening.
Faulty ductwork is often the hidden villain in HVAC airflow problems second floor homeowners experience. Common issues include undersized ducts that can’t deliver adequate airflow, leaky connections that lose up to 30% of cooled air before it reaches your rooms, and poor duct routing with too many bends that create resistance. Crushed or disconnected ducts in walls or attics completely block airflow to specific rooms.
Before investing in major upgrades, try these immediate solutions that can significantly improve your upstairs airflow within hours.
The simplest fix for poor second-floor airflow costs nothing and takes seconds. Switch your thermostat’s fan setting from “AUTO” to “ON.” This keeps air circulating continuously, preventing hot air from settling upstairs between cooling cycles.
While this may slightly increase your electric bill, the improved comfort and more even temperatures throughout your home often justify the minimal cost. This constant circulation also helps filter your air more effectively, improving indoor air quality.
Proper vent adjustment can redirect airflow where you need it most. During summer, partially close 25-50% of your first-floor supply vents to force more cool air upstairs. Never close more than half your vents, as this can strain your system.
Ensure all second-floor vents are fully open and adjusted to direct air into the room rather than along walls. For homes with basement vents, close these completely during summer since cool air naturally sinks.
Walk through your home and check every vent for blockages. Common culprits include furniture pushed against vents, long curtains covering registers, rugs placed over floor vents, and years of dust accumulation inside vent covers.
Remove all obstructions and vacuum vent covers thoroughly. Even partial blockages can significantly reduce airflow, making your upstairs vents not blowing air effectively.
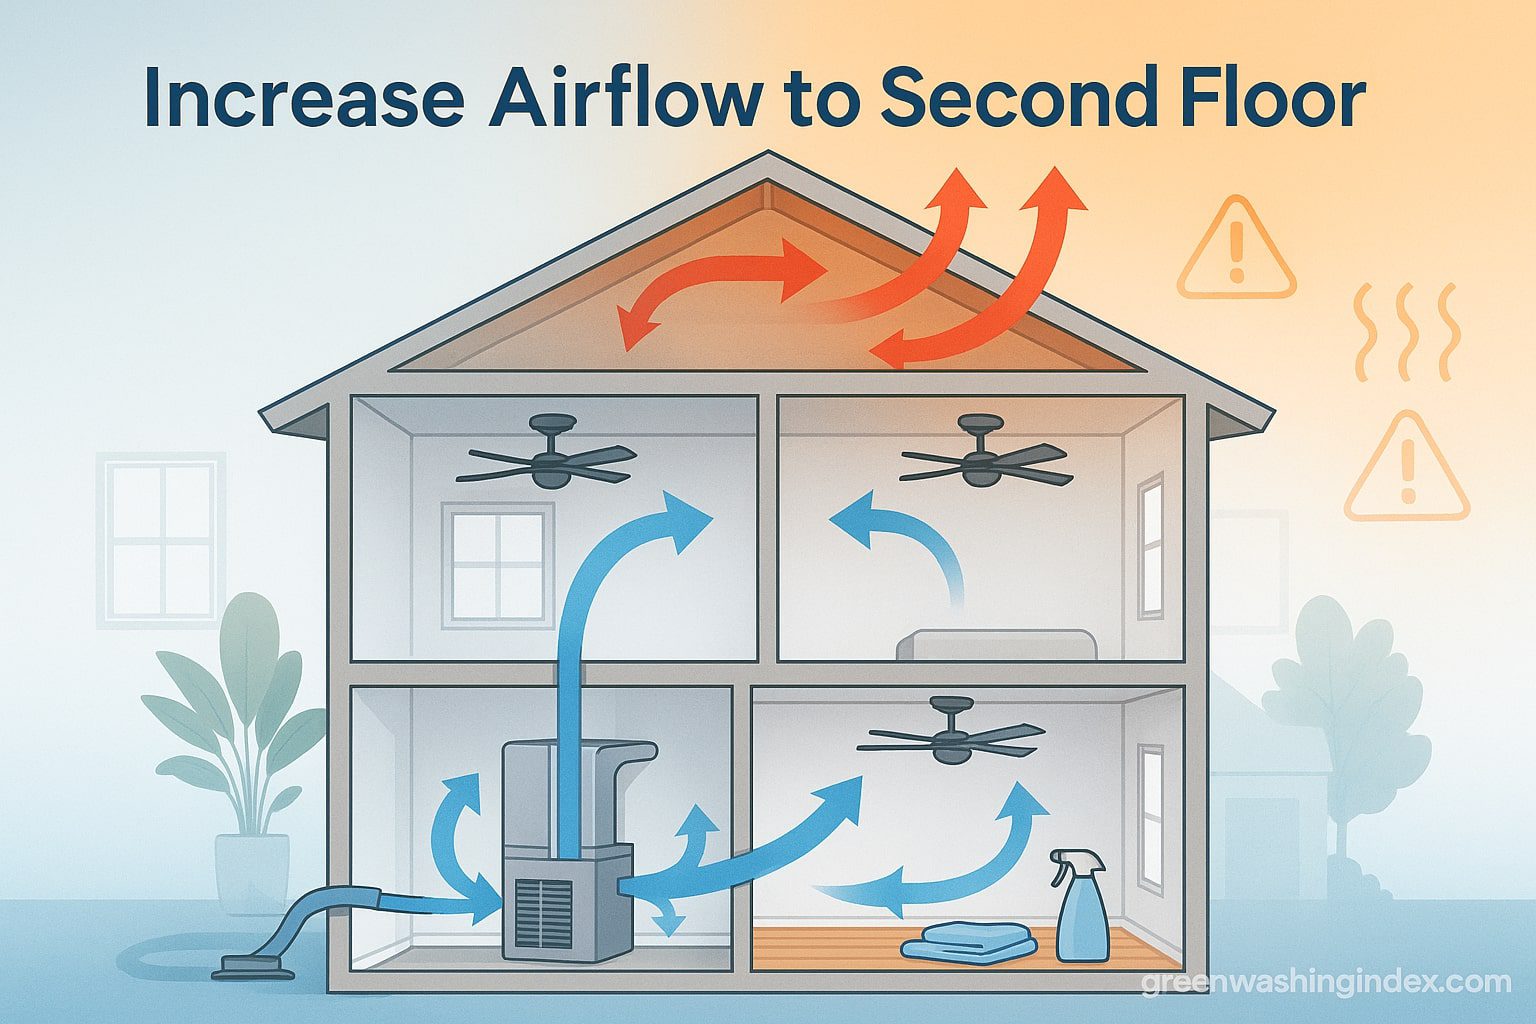
Ceiling fans can’t cool air, but they excel at circulating it. In summer, set fans to rotate counterclockwise (when looking up) to push air downward, creating a cooling breeze. This allows you to set your thermostat 3-4 degrees higher while maintaining comfort. For rooms without ceiling fans, strategically placed box fans can help pull cool air up stairways or push hot air out of particularly warm rooms.
Before implementing solutions, properly diagnose your unique situation to avoid wasting time and money on ineffective fixes.
Use a reliable thermometer to document temperature differences throughout your home. Take readings at the same time of day in multiple locations on each floor, including near vents, in room centers, at different heights (floor vs. ceiling), and in problem rooms vs. comfortable spaces. A difference of more than 3-4 degrees between floors indicates an airflow imbalance requiring attention.
Not all vents deliver equal airflow. Test each vent using the tissue paper method: hold a tissue near each vent while the system runs. Strong airflow will hold the tissue against the vent, while weak airflow barely moves it. Document which vents underperform. You can also purchase an inexpensive anemometer to measure actual airflow velocity. Vents delivering less than 50-75 CFM (cubic feet per minute) likely indicate ductwork issues.
A clogged filter restricts airflow throughout your entire system. Check your filter monthly and replace it every 1-3 months, depending on usage and type. While inspecting the filter, look for visible ductwork in your basement, attic, or crawl space. Signs of problems include disconnected or crushed sections, excessive dust around connections (indicating leaks), missing insulation on ducts, and water stains or rust.
An undersized system struggles to cool your entire home effectively. Warning signs include the AC running constantly without reaching set temperature, excessive humidity upstairs despite cooling efforts, frequent on/off cycling (short cycling), and significantly higher energy bills without improved comfort. If your system exhibits these symptoms, consult an HVAC professional to calculate your home’s actual cooling needs.
When quick fixes aren’t enough, these moderate investments can dramatically improve your upstairs comfort without breaking the bank.
Inadequate return air vents are a common bottleneck in two-story homes. Your HVAC system needs to pull warm air out as efficiently as it supplies cool air. Consider upgrading to larger return vents or adding a second return on your upper floor. This modification typically costs $500-1500 but can transform your system’s ability to remove hot air from upstairs rooms. Consult an HVAC professional to ensure proper sizing and placement.
If enlarging existing returns isn’t feasible, adding smaller return vents in each bedroom can achieve similar results. This approach, called “dedicated returns,” ensures each room’s warm air has a direct path back to your HVAC system. While more complex than a single large return, this method often provides superior room-by-room temperature control and can eliminate hot spots in problem rooms.
Your attic is the frontline defense against heat infiltrating your second floor. Upgrading attic insulation to R-38 or higher can reduce heat transfer by up to 50%. Equally important is proper ventilation through soffit vents for cool air intake, ridge or gable vents for hot air exhaust, and potentially powered attic fans for active ventilation. This combination keeps your attic cooler, reducing the heat load on your second floor. Consider eco-friendly home improvements that enhance both comfort and sustainability.
Air leaks sabotage your HVAC system’s efficiency. Common leak locations include windows and door frames, electrical outlets on exterior walls, where walls meet the ceiling, and attic access panels. Use caulk for small gaps, weatherstripping for doors and operable windows, and expanding foam for larger openings. This sealing process not only improves airflow but also reduces energy waste, aligning with sustainable living practices.
For homes with severe temperature imbalances, these professional-grade solutions offer the most comprehensive results.
Zoning divides your home into separate temperature-controlled areas, typically one zone per floor. Each zone has its own thermostat and dampers in the ductwork that open or close based on that zone’s needs.
Benefits include independent temperature control for each floor, reduced energy waste by not overcooling the first floor, potential energy savings of 20-30%, and extended HVAC equipment life due to reduced runtime. Installation costs range from $2,000-5,000 for existing systems.
Ductless mini-splits provide targeted cooling exactly where needed without extensive ductwork modifications. These systems are ideal for problem rooms or entire upper floors. Advantages include high efficiency with SEER ratings often exceeding 20, quiet operation compared to window units, individual room temperature control, and relatively easy installation. A single-zone mini-split typically costs $3,000-5,000 installed.
Modern smart thermostats can create virtual zones using remote sensors placed throughout your home. These systems learn your patterns and adjust temperatures proactively. Features include room-by-room temperature monitoring, automatic adjustments based on occupancy, integration with existing HVAC systems, and potential utility rebates for installation. Smart thermostats represent an excellent middle ground between basic fixes and major system overhauls.
Sometimes, replacing your entire HVAC system is the most cost-effective long-term solution. Consider replacement if your system is over 15 years old, requires frequent repairs, uses outdated R-22 refrigerant, or was never properly sized for your home. Modern high-efficiency systems can reduce cooling costs by 40% while providing superior comfort. When selecting new equipment, ensure proper sizing through Manual J calculations and consider variable-speed systems for optimal airflow control.
Adapting your approach seasonally maximizes comfort while minimizing energy use throughout the year.
During peak summer heat, implement these strategies: close blinds and curtains during the day to block solar heat gain, use energy-efficient appliances that generate less heat, run heat-generating activities (cooking, laundry) during cooler evening hours, and set your upstairs temperature 2-3 degrees lower than downstairs. Consider installing a whole-house fan to exhaust hot air during cooler evening hours, dramatically reducing the heat load for the next day.
Winter requires reversing many summer strategies. Open first-floor vents fully while partially closing upstairs vents, reverse ceiling fan direction to clockwise to redistribute warm air, use programmable thermostats to reduce heating when rooms are unoccupied, and ensure cold air returns are at floor level where cool air settles. These adjustments work with natural convection rather than against it.
Windows account for 25-30% of residential heating and cooling energy use. Invest in cellular shades or thermal curtains for west and south-facing windows, install awnings or exterior shades for maximum heat rejection, apply window film to reduce UV and heat transmission, and plant deciduous trees for natural summer shading that allows winter sun. These passive strategies reduce the load on your HVAC system year-round.
Understanding the cost-benefit ratio of different solutions helps prioritize your investments.
| Solution | Cost Range | DIY Possible | Effectiveness | Energy Savings |
| Adjust vents & fan settings | $0 | Yes | Moderate | 5-10% |
| Install ceiling fans | $150-500 | Yes | Moderate | 10-15% |
| Seal air leaks | $200-500 | Yes | High | 10-20% |
| Add attic insulation | $1,000-3,000 | Partial | High | 15-25% |
| Enlarge return vents | $500-1,500 | No | High | 10-15% |
| Install zoning system | $2,000-5,000 | No | Very High | 20-30% |
| Add mini-split unit | $3,000-5,000 | No | Very High | 25-35% |
| Replace HVAC system | $5,000-10,000 | No | Very High | 30-40% |
Start with these budget-friendly improvements: replace air filters monthly ($20-40), install door sweeps and weatherstripping ($30-50), add vent deflectors to improve airflow direction ($20-30), and use portable fans strategically ($30-60). These simple changes can noticeably improve comfort while you plan larger investments.
Mid-range professional services offer excellent value: duct sealing and insulation ($500-1,500), return vent modifications ($500-1,500), attic air sealing ($1,000-2,000), and smart thermostat installation ($500-1,000). These improvements typically pay for themselves through energy savings within 3-5 years.
For persistent problems, major upgrades provide comprehensive solutions: zoning system installation ($2,000-5,000), ductless mini-split addition ($3,000-5,000 per zone), complete duct replacement ($3,000-7,000), and new high-efficiency HVAC system ($5,000-10,000). While expensive, these upgrades can transform your home’s comfort and reduce energy costs by 30% or more.
Learn from others’ errors to ensure your efforts succeed:
• Closing too many vents: Never close more than 25-50% of your first-floor vents. Excessive closure increases system pressure, potentially damaging your blower motor and ductwork while actually reducing overall efficiency.
• Ignoring regular maintenance: Skipping filter changes and annual tune-ups undermines all other improvements. A dirty system works harder, delivers less airflow, and fails prematurely. Establish a maintenance routine including monthly filter checks and annual professional service.
• Installing wrong-sized equipment: Bigger isn’t always better with HVAC equipment. Oversized systems short-cycle, failing to dehumidify properly and creating temperature swings. Always use Manual J calculations for proper sizing.
• Neglecting the attic: Focusing solely on your HVAC system while ignoring attic conditions is like treating symptoms without addressing the disease. Proper attic insulation and ventilation can reduce your cooling load by 30%.
• DIY complex modifications: While many improvements are DIY-friendly, modifying ductwork, electrical systems, or refrigerant lines requires professional expertise. Improper installation can create safety hazards and void equipment warranties.
Improving airflow doesn’t just enhance comfort, it significantly reduces energy consumption and costs.
Balanced airflow allows your HVAC system to operate at peak efficiency. When air circulates properly, your system runs shorter cycles to maintain temperature, reduces strain on components extending equipment life, eliminates hot and cold spots that trigger constant adjustments, and maintains consistent humidity levels throughout your home. These improvements typically reduce cooling costs by 15-30%.
Understanding payback periods helps prioritize investments: simple adjustments (vents, filters) pay back immediately through improved comfort, air sealing and insulation typically pay back in 2-3 years, duct improvements and zoning systems pay back in 3-5 years, and complete system replacements pay back in 5-8 years. Factor in available rebates and increasing energy costs when calculating ROI.
Many utilities and governments offer incentives for energy-efficient improvements. Common programs include rebates for ENERGY STAR certified equipment, tax credits for insulation and air sealing, utility rebates for smart thermostats, and low-interest financing for comprehensive upgrades.
Check the Database of State Incentives for Renewables & Efficiency for programs in your area. These incentives can reduce upgrade costs by 20-50%.
Knowing when to DIY and when to call professionals ensures safe, effective improvements.
Many airflow improvements are perfect for DIY home maintenance: adjusting vents and dampers, replacing air filters, installing ceiling fans, sealing visible air leaks, adding weatherstripping, cleaning vent covers, and installing smart thermostats. These projects require basic tools and can be completed safely with online guidance.
Certain tasks require professional expertise: modifying ductwork or adding vents, handling refrigerant or electrical connections, sizing and installing new equipment, diagnosing complex airflow issues, and performing combustion safety tests. Professionals have specialized tools, training, and insurance to handle these tasks safely and effectively.
Before hiring a contractor, ask these essential questions: Are you licensed and insured in my state? Can you perform a Manual J calculation for proper sizing? What warranties do you offer on equipment and labor? Do you pull required permits for installations? Can you provide references from similar projects? Will you test and balance the system after installation? What rebates or financing options are available? A reputable contractor will answer these questions transparently and provide detailed written estimates.
Adding return air to your second floor typically costs $500-1,500, depending on the complexity. This includes cutting the opening, installing the grille, connecting new ductwork, and balancing the system. Costs increase if ductwork must run through finished walls or if multiple returns are needed. This investment often provides immediate comfort improvements and pays for itself through energy savings within 3-5 years.
Partially closing first-floor vents (25-50%) is generally safe and can improve upstairs airflow. However, closing too many vents increases static pressure in your ductwork, potentially causing blower motor strain, increased energy consumption, duct leaks, and frozen evaporator coils. Never close more than half your vents, and monitor your system for unusual noises or cycling patterns.
Installing a dedicated upstairs AC unit is a viable solution for persistent comfort issues. Options include ductless mini-splits for individual rooms or zones, a second central system with separate ductwork, or window units as temporary solutions. While the initial investment is significant ($3,000-8,000), dedicated upstairs cooling often provides the best long-term comfort and efficiency, especially in older homes with inadequate ductwork.
Weak or absent airflow from upstairs vents indicates several possible issues: disconnected or crushed ductwork in walls or attic, closed dampers in the duct system, extremely dirty air filters restricting flow, undersized ductwork unable to deliver adequate CFM, or blower motor problems. Start by checking your filter and visible ductwork, then consult a professional if problems persist.
The timeline varies based on your approach: immediate adjustments (vent management, fan settings) show results within hours, air sealing and insulation improvements take 1-2 days to complete with results apparent immediately, duct modifications or return vent additions require 1-3 days with immediate improvement, and major system upgrades need 2-5 days for installation plus adjustment time. Most homes achieve noticeable improvement within a week of implementing comprehensive solutions.
Achieving balanced airflow in your two-story home doesn’t require suffering through another sweltering summer upstairs. Start with the free adjustments, switch your fan to “ON,” strategically adjust your vents, and clear any blockages. These simple changes often provide surprising relief while you evaluate longer-term solutions.
For most homes, intermediate fixes like improving attic insulation, adding return air vents, or sealing air leaks provide the best balance of cost and comfort. These investments typically pay for themselves through energy savings while dramatically improving your quality of life. Consider how green home improvements can enhance both comfort and sustainability.
Remember, every home is unique. What works for your neighbor might not be ideal for your situation. Use the diagnostic steps to understand your specific challenges, then implement solutions progressively. With patience and the right approach, you can transform your hot, stuffy upstairs into a comfortable retreat, all while reducing energy bills by up to 30%.
Don’t wait for another miserable summer. Start with simple adjustments today, plan your intermediate improvements, and enjoy consistent comfort throughout your entire home. Your future self will thank you when you’re relaxing in a perfectly cooled upstairs bedroom instead of camping out on the living room couch.